 TealTime
User's Manual
TealTime
User's Manual
Program Version 1.2.0
Last Updated: January 24, 2010
Table of Contents
Chapter 1 – Quick
Start................................................................................................. 2
Description......................................................................................................................... 2
Overview............................................................................................................................ 2
Current Timer.................................................................................................................. 2
Timer List....................................................................................................................... 2
Chapter 2 – 3D World
Globe........................................................................................ 3
Controls............................................................................................................................. 3
Configuration...................................................................................................................... 3
Name............................................................................................................................. 3
Dashboard Panel............................................................................................................ 3
Location......................................................................................................................... 3
Chapter 3 – Analog
Clock............................................................................................ 5
Configuration...................................................................................................................... 5
Name............................................................................................................................. 5
Dashboard Panel............................................................................................................ 5
Time Zone...................................................................................................................... 5
Chapter 4 – Digital
Clock.............................................................................................. 6
Configuration...................................................................................................................... 6
Name............................................................................................................................. 6
Dashboard Panel............................................................................................................ 6
Time Zone...................................................................................................................... 6
Chapter 5 – Stopwatch................................................................................................. 7
Controls............................................................................................................................. 7
Configuration...................................................................................................................... 7
Name............................................................................................................................. 7
Dashboard Panel............................................................................................................ 7
Options.......................................................................................................................... 7
Chapter 6 – Timer........................................................................................................... 9
Controls............................................................................................................................. 9
Entering Time................................................................................................................. 9
Starting and Stopping...................................................................................................... 9
Configuration...................................................................................................................... 9
Name............................................................................................................................. 9
Dashboard Panel............................................................................................................ 9
Options........................................................................................................................ 10
Chapter 7 – Alarm......................................................................................................... 11
Controls........................................................................................................................... 11
Configuration.................................................................................................................... 11
Name........................................................................................................................... 11
Dashboard Panel........................................................................................................... 11
Options........................................................................................................................ 11
Chapter 8 –Time Zones............................................................................................... 13
Selecting Time Zone by
City.............................................................................................. 13
Manually Selecting Time
Zone............................................................................................ 13
Universal Time Offset..................................................................................................... 13
Daylight Savings Time................................................................................................... 14
Chapter 7 – Dashboard
Panels................................................................................ 15
Enabling Dashboard
Panels............................................................................................... 15
Selecting.......................................................................................................................... 15
Using Dashboard Panels................................................................................................... 16
Dragging Panels............................................................................................................ 16
Selecting Panels........................................................................................................... 16
Disabling Panels........................................................................................................... 16
Chapter 8 – Preferences............................................................................................. 17
Sound Effects................................................................................................................... 17
Alert Sound...................................................................................................................... 17
Snooze Time.................................................................................................................... 17
Audio File......................................................................................................................... 17
Appendix A – Revision
History................................................................................. 18
Appendix B – Contact
Info......................................................................................... 18
Appendix C – Purchase.............................................................................................. 18
Appendix D – webOS
Products................................................................................ 19
TEALSHOPPER............................................................................................................... 19
TEALTIME....................................................................................................................... 19
Appendix E – Legal
Notice........................................................................................ 20
A powerful and versatile clock, alarm, and timer, TealTime
combines the functionality of a full featured 3D World Clock, countdown timer,
stopwatch, alarm, and both digital and analog timepieces.
With a unique flexible interface, you can define which and
how many of each clock you want.
Use it to simultaneously show multiple time zones, create
linked lap timers, or set concurrent overlapping alarms. Powerful tools let you specify rules for
adjusting to daylight savings time, calculate averages for multiple stopwatch
timings, and enabling dashboards for viewing times even when inside other
applications. Customization options let
you choose from analog or digital clocks, select days of the week in which
alarms are active, and specify whether countdown timers automatically reset and
repeat.
The TealTime main screen can be divided into two
parts:
The top half of the main screen
shows the Active Timer Area, which displays details for the
currently selected timer. You can
open the configuration screen for most timers by tapping on their main display
element at the center of the screen.
The bottom half of the main screen
shows the Timer List, which displays a summary and the
name of all available timer modules.
To create a new timer, tap on the
(+) button in the lower right. You can
create an unlimited number of timers, consisting of one or more instances of
the following six timer types detailed in the following chapters:
·
3D World Globe
·
Analog Clock
·
Digital Clock
·
Alarm
·
Stopwatch
Tap on a timer name to select it
and open its contents in the Active Timer Area. To configure a timer, tap on the (i) icon to
the right of the name. Tap and hold on a timer to
reorder it, or swipe right on a timer to delete it.
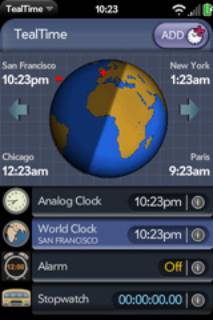
The 3D World Globe simultaneously lists times at up to four different world
locations, and displays a 3D graphic representation of the earth complete with
selected cities and day/night shadow line.
Tap on the arrows to rotate
the globe, or tap on a city name to automatically rotate the selected city to
the center of the display.
The Timer List displays the
current time at all (up to 4) defined cities, switching between them at
2-second intervals.
Open up the configuration
screen by tapping on the globe or on the (i) icon to the right of the clock
name in the Timer List. The
following options are available.
Selects
the name displayed in the Timer List and optional Dashboard Panel.
Enables
a dashboard panel resembling the Timer List entry that will appear
whenever the TealTime application is closed or minimized. See the “Dashboards” Chapter of this manual
for more information.
Lets
you specify and enable up to four locations to appear on the World Globe.
 City
City
Tap Edit
to manual enter details for a location, or City to select from a list of
popular international cities.
See
the Chapter: “Time Zones” for more information on manually selecting a location
by city.
Edit
Latitude and Longitude
Specify
the city location in degrees and minutes.
This value is used solely for locating the city graphically on the globe
and does not affect time calculations.
See
the Chapter: “Time Zones” for more information on manually setting the other
time zone fields.
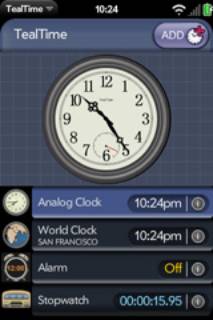
The Analog Clock shows a graphic representation of an animated wall clock
complete with second hand.
You may create multiple analog
clocks, each one independently set to a different time zone with optional
automatic updating for daylight savings time.
The time is shown numerically in the Timer List and optional Dashboard
Panel.
Open up the configuration
screen by tapping on the clock face or on the (i) icon to the right of the
clock name in the Timer List.
The following options are available.
Selects
the name displayed in the Timer List and optional Dashboard Panel.
Enables
a dashboard panel resembling the Timer List entry that will appear
whenever the TealTime application is closed or minimized. See the “Dashboards” Chapter of this manual
for more information.
Select
Local to automatically display the local system time maintained by your
device, or Manual to specify another time zone. See the Chapter: “Time Zones” for more
information on manually setting the time zone by city or manual edit screen.
The Digital Clock shows the time in large letters readable from a long
distance.
You may create multiple
digital clocks, each one independently set to a different time zone with
optional automatic updating for daylight savings time. The time also shown in the Timer List
and optional Dashboard Panel.
 Open up the configuration screen by tapping on the
clock face or on the (i) icon to the right of the clock name in the Timer
List. The following options are
available.
Open up the configuration screen by tapping on the
clock face or on the (i) icon to the right of the clock name in the Timer
List. The following options are
available.
Selects
the name displayed in the Timer List and optional Dashboard Panel.
Enables
a dashboard panel resembling the Timer List entry that will appear
whenever the TealTime application is closed or minimized. See the “Dashboards” Chapter of this manual
for more information.
Select
Local to automatically display the local system time maintained by your
device, or Manual to specify another time zone. See the Chapter: “Time Zones” for more
information on manually setting the time zone by city or manual edit screen.
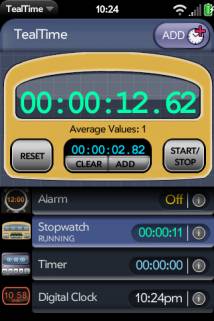
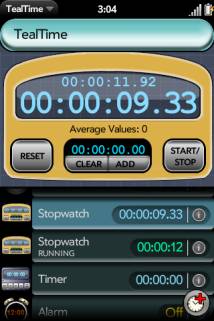
The Stopwatch can be used to show elapsed time, and features handy features
such automatic average-time calculation, “shake” activation, timer restarting,
and optional linking of multiple stopwatches as lap-timers.
Tap on the Start/Stop
button to start or stop the timer, or Reset to set it to
zero. If the timer is running, tapping Reset
will first stop the timer and zero the time on a second press.
When the timer is stopped, you
can tap Add to add the displayed time to the list of averaged
time values. The average value and the
number of averaged times in memory are shown above. Tap Clear to erase all saved times from the
averaging memory.
Open up the configuration
screen by tapping on the elapsed time display or on the (i) icon to the right
of the timer name in the Timer List.
The following options are available.
Selects
the name displayed in the Timer List and optional Dashboard Panel.
Enables
a dashboard panel resembling the Timer List entry that will appear
whenever the TealTime application is closed or minimized. See the “Dashboards” Chapter of this manual
for more information.
Select
from the following options:
Allow Timer Restart
When
this option is enabled, tapping the start/stop button (or shaking) with restart
the timer either at the current time or at zero, depending on the setting
below.
Zero when Restarting
If
the above option is enabled, this option restarts the timer at zero instead of
adding more time to the current total.
Turn this option on to easily restart the timer without hitting Reset,
or off to record total time (such as billable time) that might occur with
occasional interruptions.
When
using the “shake” option below, you might want to turn this option off to
prevent accidental restarting of the timer.
Shake to Start/Stop
When
this option is enabled, you can conveniently start and stop a selected timer by
suddenly shaking the device.
When
doing so, you we recommend shaking the device as one sudden back and forth
motion. The text “Shaking” will appear
in the program title bar. Before
shaking a second time, you need to first stop shaking the device, holding it
still until this indicator goes away.
If sounds are enabled, a “click” sound will indicate when
shake-detection is again active.
Link as Lap Timer
To use stopwatches as lap timers,
create multiple Stopwatch timers and enable the Link as Lap Timer
option in all of them.
All the timers will start
simultaneously if either the Start/Stop button is pressed in any
timer or if the device is shaken (with the “Shake” option enabled). Subsequent presses of the Start/Stop
button will then sequentially stop the next linked timer that is running.
When operating in Lap Timer mode,
the first “other” lap timer is shown in small numbers above the current
timers’s elapsed time.
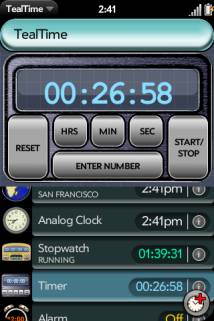
Timers can be used to set to sound an alert after a specified amount of time
has passed. As such, they are handy for
putting up temporary reminders for cooking and other tasks.
A timer can be set to
automatically reset so it continually sounds an alarm at regular intervals, which
is useful for recurring tasks like feeding a parking meter.
To
enter a time, tap on the Hrs, Min, or Sec
buttons to increment the displayed time, or Enter Number to enter
enter the time numerically via on-screen keypad.
Enter
times in seconds, minutes-and-seconds, or hours-minutes-and-seconds. For example, enter “12345” for 1:23:45 (1
hour, 23 minutes, and 45 seconds) or “123” for 1:23 (1 minute, 23 seconds).
If
you enter more than 59 minutes or 59 seconds, the value will automatically be
converted to the correct format (e.g. the timer will be set to 1:30 if you
enter “90”)
 Tap on the Start/Stop button to start or
stop the timer, or Reset to reset the timer. If the timer is running, tapping Reset
will first stop the timer. A subsequent
press will restore the timer to the last set time, and yet one more tap will
reset it to zero.
Tap on the Start/Stop button to start or
stop the timer, or Reset to reset the timer. If the timer is running, tapping Reset
will first stop the timer. A subsequent
press will restore the timer to the last set time, and yet one more tap will
reset it to zero.
Open up the configuration
screen by tapping on the remaining time display or on the (i) icon to the right
of the timer name in the Timer List.
The following options are available.
Selects
the name displayed in the Timer List and optional Dashboard Panel.
Enables
a dashboard panel resembling the Timer List entry that will appear whenever
the TealTime application is closed or minimized. See the “Dashboards” Chapter of this manual for more information.
Select
from the following options:
Auto Restart
Enable
this option to make the timer run continuously, sounding periodic alarms at the
specified interval.
Max Times to Sound
Specifies
the maximum number of times an alarm will sound if unanswered. If set to 0, sounds continuously until
answered.
(New in 1.1)

Alarms sound and bring up an alert and at a specified time of day.
You can create as many
independent alarms as you wish. Each
alarm can also be set only to come up on specified days of the week.
The current time is displayed in large number. If the alarm is on, the alarm time is shown
below the current time and a countdown is show above.
Tap ON
to enable a specified alarm or OFF to disable it set the alarm
time in the configuration screen described below.
Open up the configuration
screen by tapping on the alarm clock face or on the (i) icon to the right of
the timer name in the Timer List.
The following options are available.
Selects
the name displayed in the Timer List and optional Dashboard Panel.
Enables
a dashboard panel resembling the Timer List entry that will appear
whenever the TealTime application is closed or minimized. See the “Dashboards” Chapter of this manual
for more information.
Select
from the following options:
 Time
Time
Sets
the time the alarm will sound
Days of the Week
Sets
which days the alarm will be active. At
least one box must be checked.
Alarm Enabled
Check
this box to turn on the alarm. This
duplicates the functionality of the ON/OFF buttons on the alarm
Active Timer Area display.
Alarm Repeats Daily
If
enabled, the alarm will continue to sound daily on the enabled days of the
week. If unchecked, the alarm will
sound once and then turn itself off.
Max Times to Sound
Specifies
the maximum number of times an alarm will sound if unanswered. If set to 0, sounds continuously until
answered.
(New in 1.1)
The Analog,
Digital, and World clocks in TealTime can each be set to
different time zones with independent time offsets and Daylight Savings
Rules. These can be set either by selecting
a listed city or manually editing the individual settings.
Tap
on a city name to load its location and time zone information. For convenience, the name of the city will
also replace the current timer name, though you can still change it after
selecting the city if you wish.
Select
Jump to Country to quickly scroll the list to a listed country.
Note: Some countries do not
follow regular daylight savings rules and specify when daylight savings by
complex rules or by government decree that may change from year to year. For these countries, daylight savings dates
are estimated in the City lists.
The following options are available:
Selects
the difference in time between the desired location and Universal Time
(a.k.a. Greenwich Mean Time). Do not include Daylight Savings Time
adjustments.
For
instance, New York City normally lags behind Universal Time by 5 hours, so the
Universal Time Offset should be set to “- 5:00”.
Select ON to enable daylight
savings time, which advances the clock by one hour, or OFF to disable it. When set to AUTO, daylight savings time is
automatically enabled during the date range specified in the boxes below.
Daylight savings start and stop
dates can be specified by a day of the year or one of the following common
rules:
·
First Friday of the month
·
First Sunday of the month
·
Second Sunday of the month
·
Third Sunday of the month
·
Last Sunday of the month
·
Last Thursday of the month
·
Last Friday of the month
While countries change their DST
rules from time to time, the following common rules are currently in effect:
United States and Canada
Second Sunday in March until first
Sunday in November (except Arizona)
Europe (except Iceland)
Last Sunday in March until last
Sunday in October
Australia
First Sunday in October until first
Sunday in April
Dashboard panels allow you to
view selected timers when TealTime is minimized or otherwise not running.

Turn
on the dashboard for a timer by selecting the Dashboard Panel
option in that timer’s configuration screen.
When
the TealTime card is minimized, the Dashboard Panels will open. As is the case with any dashboard panel,
webOS indicates the presence of the dashboards by displaying icons in the
notification area at the bottom of the display.
The
open the Dashboard, tap on the notification area.
The
dashboard panels appear very much like the timers in the Timer List,
summarizing the same information.
You
can organize the dashboard panels by dragging them. This will not affect the order of the timers in the main program Timer
List.
Tap
on a dashboard panel to open TealTime and automatically select the
corresponding timer.
You
can also swipe right to disable a dashboard panel. This will not delete the timer itself, but only close the panel
and turn off the Dashboard Panel option in that timer’s configuration
screen. You will see a popup dialog
asking for your confirmation before disabling the panel.
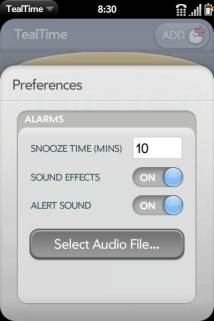
Select the Preferences item from the TealTime application menu to
set the following preferences:
Turns on and off the various
clicking sounds assigned to timer button presses.
When this option is enabled
TealTime adds additional alarm chime for timer and alarm dialogs. If this option is turned off, then the only
sound that may sound is the standard webOS system alert sound that may or may
not accompany standard dialogs depending on your webOS system sound settings.
Sets the time that the snooze button puts an alert to sleep. The entered time should be in minutes.
Select an audio file to be played when an alarm or timer sounds. (New in 1.2)
Version
1.2.0 - January 24, 2010
·
Added
new option to use music file for alarm sound
·
Improved
visual appearance
Version
1.1.0 – November 24, 2009
·
Added
option to specify maximum number of times alarm will sound if not answered
·
Added
vibration to alarms when sounding
·
Fixed
blank page from briefly appearing on program launch
·
Fixed
alarms to correctly sound only once if daily repeat set to off
Version
1.0.3 – November 9, 2009
·
Submission
of initial version to Palm
TealTime by TealPoint Software
©2009-2010
All Rights Reserved.
TealPoint Software
454 Las Gallinas Ave #318
San Rafael, CA 94903-3618
We look forward to hearing from you.
Please visit us at www.tealpoint.com, or
email us at support@tealpoint.com.
TealTime is available exclusively through
the Palm webOS App catalog.
Visit us online for our complete product line for webOS,
including:
( http://www.tealpoint.com/softshop.htm )
List and organize your shopping, tasks, and errands with
TealShopper, the supercharged list manager from TealPoint Software. With TealShopper, you can easily organize
your entries with drag and drop categories in an attractive, intuitive
interface.
To save time with commonly purchased items, you can save
them into a frequently-used items list and reload them at any time. Other tools let you flag important items,
make copies of lists, and customize each list's appearance and categories. Finally, to help plan your budget, you can
even enter product quantities and prices, and have your total automatically
calculated for you before you reach the checkout line.
( http://www.tealpoint.com/softtime.htm )
A powerful and versatile clock, alarm, and timer, TealTime
combines the functionality of a full-featured 3D World Clock, countdown timer,
stopwatch, alarm, and both digital and analog timepieces.
With a unique flexible interface, you can define which and
how many of each clock you want. Use it
to simultaneously show multiple time zones, create linked lap timers, or set
concurrent overlapping alarms.
We at TealPoint Software are committed to
providing quality, easy-to-use software. However, this product is provided
without warranty and the user accepts full responsibility for any damages,
consequential or otherwise, resulting from its use.
This archive is freely redistributable,
provided it is made available only in its complete, unmodified form with no
additional files and for noncommercial purposes only. Any other use must have
prior written authorization from TealPoint Software.
Unauthorized commercial use includes, but
is not limited to:
§
A product for sale.
§
Accompanying a product for sale.
§
Accompanying a magazine, book or other
publication for sale.
§
Distribution with "Media",
"Copying" or other incidental costs.
§
Available for download with access or
download fees.
This program may be used on a trial basis
for 30 days. The program will continue to function afterwards. However, if
after this time you wish to continue using it, please register with us for the
nominal fee listed in the program.
Thank you.
CUSTOMER
LICENSE AGREEMENT
YOU
ARE ABOUT TO DOWNLOAD, INSTALL, OPEN OR USE PROPRIETARY SOFTWARE OWNED BY
TEALPOINT SOFTWARE, INC. CAREFULLY READ THE TERMS AND CONDITIONS OF THIS END
USER LICENSE BEFORE DOING SO, AND CLICK BELOW THAT YOU ACCEPT THESE TERMS.
1.
License. You are authorized to use the Software Product owned and developed by
TealPoint Software, Inc. on a single hand-held computing device on a trial
basis for thirty (30) days. If after 30 days you wish to continue using it, you
are required to register with TealPoint and pay the specified fee. This license
is not exclusive and may not be transferred. You may make one copy of the
Software for back-up and archival purposes only.
2.
Ownership. You acknowledge that the Software Product is the exclusive property
of TealPoint Software, Inc, which owns all copyright, trade secret, patent and
other proprietary rights in the Software Product.
3.
Restrictions. You may NOT: (a) decompile or reverse engineer the Software
Product; (b) copy (except as provided in 1 above) sell, distribute or
commercially exploit the Software product; or (c) transfer, assign or
sublicense this license.
4.
Disclaimer of Warranty and Liability. TEALPOINT MAKES NO WARRANTY, EXPRESS OR
IMPLIED, AS TO THE ACCURACY, COMPLETENESS OR FUNCTIONING OF THE LICENSED
SOFTWARE, INCLUDING WITHOUT LIMITATION, WARRANTIES OF MERCHANTABILITY OR OF
FITNESS FOR A PARTICULAR PURPOSE, ALL OF WHICH TEALPOINT DISCLAIMS. ALL LIABILITY
IS DISCLAIMED AND TEALPOINT ASSUMES NO RESPONSIBILITY OR LIABILITY FOR LOSS OR
DAMAGES OF ANY KIND, DIRECT OR INDIRECT, INCIDENTIAL, CONSEQUENTIAL OR SPECIAL,
ARISING OUT OF YOUR USE OF THE LICENSED SOFTWARE, EVEN IF ADVISED OF THE
POSSIBILITY THEREOF.
5.
Termination. You may terminate this Agreement at any time by destroying your
copy(ies) of the Software Product. The Agreement will also terminate if you do
not comply with any of its terms and conditions, at which time you are required
to destroy your copy(ies) of the Software Product and cease all use.
6.
Applicable Law. This Agreement is governed by the laws of the State of
California.