
TealPaint User's Manual
Program Version 7.11
Last Updated: April 21, 2008
Table of Contents
Introduction
Contents
Installing
Chapter 1 – Overview
File Screen
Actions
Preferences
Image Screen
Opening/Animating Images
Creating a New Image
Moving and Converting Images
Importing and Exporting JPEG, GIF and BMP Images
Special Functions
Drawing Screen
Chapter 2 – Drawing
Tools
Brushes
Patterns and Ink
Zoom Control
Undo
Menus
Image Menu
Edit Menu
Option Menu
Chapter 3 – Tutorial
Step 1 – Create and open a new database
Step 2 – Create and open a new image
Step 3 – Set the foreground color to color blue using the color menu
Step 4 – Select the curve draw tool
Step 5 – Draw a waterline using the curved line tool
Step 6 – Fill below the waterline using the paint bucket
Step 7 – Fill the sky with light blue
Step 8 – Set the foreground color to beige using the system color
picker
Step 9 – Select and draw an island using the polygon/shape tool
Step 10 – Add a new layer
Step 11 – Draw a tree trunk using the polygon tool
Step 12 – Draw coconuts using the filled circle tool
Step 13 – Draw leaves using the polygon tool
Step 14 – Enclose the tree using the selector tool
Step 15 – Move the tree using the selector tool
Step 16 – Copy the tree to the clipboard
Step 17 – Add a new intermediate layer
Step 18 – Paste a smaller copy of the tree
Step 19 – Add a title using the text tool
Step 20 – Add a sun using the circle tool
Step 21 – Merge layers
Step 22 – Select the tree brown color using the eye dropper
Step 24 – Magnify details using the zoom control
Step 25 – Draw highlights using the curve draw tool
Step 26 – Add details and finishing touches
Chapter 4 – Editing
External File Formats
Chapter 5 – Tips and
Tricks
Using External Storage
Cards under PalmOS
Using Layers
Drawing Large Text
Drawing Polygons and
Shapes
Using Blur with
transparent layers
Animation Speed
Chapter 6 – TealPoint
Image Manager
Step 1 – Select a
Database File
Step 2 – Preview images
Step 3 – Import or
Export Images
Importing an Image
Importing Multiple Images
Exporting Images
Step 4 – Other Actions
Printing an Image
Install Database
Appendix A – TealPoint
File List
File Lists
Navigation
Categories
Flash Memory
Appendix B – TealPoint
File Manager
Moving/Copying Files
Appendix C – TealPoint
Button Manager
Description
Changing Default
Mappings
Creating New Mappings
Appendix D – TealPoint
Pen-Free Navigation
Appendix E – Compatibility
Notes
Image Formats
Macintosh
Use as an external editor
Appendix F – Using
PicUtil
Interactive Mode
Batch Mode
Appendix G – Products
Appendix H – Revision
History
Appendix I – Contact
Info
Appendix J –
Registering
Appendix K – Legal
Notice
Introduction
TealPaint
is a powerful but easy-to-use paint, photo-editing, and animation program for
mobile devices.
TealPaint provides a wide array
of tools that you can use to easily create and edit images and animations, or
use it with other TealPoint applications to illustrate documents and folios.
TealPaint’s
unmatched set of features include:
Image Formats
·
High
resolution support
·
1,2,4,8,
or 16 bit images
·
Unlimited
image sizes
·
Multiple
image databases
·
Direct
card (SD,CF,MMC) support
Drawing Tools
·
Freehand
draw tool
·
Spotty
draw tool
·
Smoothed
draw tool
·
Line
draw tool
·
Constrained
line tool
·
Freehand
shape/polygon tool
·
Box,
filled box draw
·
Rounded
box, filled rounded box
·
Circle,
filled circle
·
Oval
draw tool
·
Snap
to grid
·
Erase
tool
·
Paint
bucket
·
Text
tool with selectable fonts, color
·
Marquee
tool (rectangular select)
·
Lasso
tool (freehand select)
·
Rubber
stamp tool
Effects
·
49
Draw brushes
·
16
Draw patterns
·
Multiple
image layers
·
5
magnification levels
·
Multiple
undo levels
·
Horizontal
and vertical flipping
·
Image
scaling
·
Image
rotation
·
Image
blur
·
Gradient
fill
Extras
·
Image
Templates
·
Image
Cut/Copy/Paste
·
Screen-grabbing
import function (PalmOS)
·
Printing
via TealPrint (PalmOS)
·
Animation
capabilities
·
Slideshow
mode
·
Direct
BMP and JPEG import and export
·
TealPaint
Image Manager, a Windows import, export, and print utility
Contents
PalmOS
This
archive contains the following files:
Program
files:
TEALPNT.PRC The TealPaint program file
IMAGEMGR.EXE Image Database import/export/print
utility (Windows)
PICUTIL.EXE Image Database import/export utility (DOS)
TPSETUP.EXE TealPoint One-step installer (Windows)
FONTBUCKET.PRC PalmOS add-on font manager
FBFONTS.PDB Sample add-on fonts (from TealDoc)
Document
files:
PNTDOC.PDF This document in Adobe Acrobat
(PDF) format
PNTDOC.HTM This
document in HTML format (sans images)
PNTDOC.PRC This
document in TealDoc format
REGISTER.HTM TealPoint
Registration form in HTML format
REGISTER.TXT TealPoint
Registration form in text format
Installing
PalmOS
On a Windows PC, you can also double-click on the installation program TPSETUP.EXE and follow the on screen prompts.

For other desktops, you can also use the Palm
Install Tool icon (or “Quick Install”) in the Palm Desktop application to
install the program file TEALPNT.PRC. It will appear on the Palm
Computing device after the next HotSync.
This manual is also provided in this archive as the Palm document PNTDOC.PRC, which can be viewed with
our other application TealDoc.
Instructions on how to use the
Palm Install Tool can be found in the handbook or Palm Desktop user guide that
came with your handheld device.
Foleo
Open the File Manager and double-click on the tealpnt_x.xx.x_arm.hxp install file. Follow the on-screen prompts.
Chapter 1 – Overview
TealPaint's intuitive interface should feel familiar for anyone experienced in using traditional PC-based drawing packages. It consists of three main interface screens: the file screen, the image screen, and the drawing screen.
File Screen

The TealPaint File Screen appears when you first run the application. Listing all currently installed
TealPaint-format image databases and BMP, GIF, and JPEG files in the current
category and storage location, it consists of a standard TealPoint File List
and a column of action pushbuttons to the right. Tap on a file name to open, modify, or delete that file.
Please see Appendix A for more information on using a standard TealPoint File
List.
Actions
The Action
Buttons define what happens when a file in the image list is selected. Supported actions include:
Opens
Opens the selected image database for viewing or editing. If the selected file is a JPEG, BMP, or GIF
file, you may preview the file or import it into an image database.
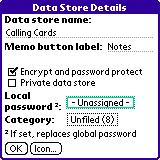
Details
Brings up information about the selected database and allows
changing of its category and backup state.
Rename
Renames the selected file
Delete
Deletes the selected file
Move
Moves or copies the selected file to a new location
Beam
Beams the selected file to another handheld (PalmOS only)
Preferences
The Preferences menu allows
you to select or modify the following options:
Remember Category
When selected, the last open category is restored when you exit
and return to TealPaint. When
unchecked, the current category is set to “All”.
Hi-res image preview
When selected, jpeg/gif/bmp images are previewed in high
resolution on hires devices. This
provides a more detailed preview image, but is slower.
Use card space for work/undo
When selected, an external SD card is used for temporary working
space when editing images. This is
useful when editing large images if main memory is running low, but slows down
drawing operations and load/save.
Use fancy system fonts
When selected, streamlined “thin” fonts are used for TealPaint’s
program interface when running on high-resolution devices. Set to ‘Auto’ to use standard “non-thin”
fonts for buttons. (New in 7.11)
Undo buffer size
This option set the size of the undo buffer used when editing an
image, and is specified as the number
of screen-sized buffers allocated.
Increase this count for more undo buffers, or decrease it if you are
running low on memory.
Image Screen

The TealPaint Image Screen lists the images (if any) stored in the current image database. From the image screen you can open, delete, or create a new image in the current database. You may also use menu selections to import JPEG, GIF or BMP images into the database or export selected image out into those formats.
The images
are listed vertically on the screen, with a thumbnail representation on the
left and the image description on the right.
If no thumbnails appear, the database is empty. TAP
‘New’ to create a new image in the database (see following section).
TAP on a thumbnail image to OPEN that image for
editing, animating, or viewing. Tap on
the description, on the other hand, to select the image and activate a text
cursor for editing the description. A
pick list at the bottom of the screen selects which action occurs when you tap
on a thumbnail.
Opening/Animating Images
When a thumbnail image is tapped, one of the following actions can occur.
Edit on tap
Opens the tapped image for editing
in the drawing screen
View Only
Opens the tapped image in the
viewing screen
Animate
Cycles through all the images in the database, starting with the
tapped image. The program will attempt
to display the images according to the speed specified in the application
animation settings. The maximum possible speed depends on the image resolution,
bit depth, and speed of the handheld.
Slideshow
Similar to the “animate” option, “slideshow” cycles through the
images in sequence starting with the selected image. The playback is governed by the slideshow delay settings, and can
optionally display image titles beneath each image.
Creating a New Image
TAP
on “New” to create a new blank image in the database.
A popup dialog window will appear, allowing you to specify detail about the new blank image. Images can be of any specified size, memory permitting, and one of the five bit-depth formats, if supported by the handheld.
Image Size
Tap on “screen size” to create a new image with the current screen dimensions. Under PalmOS, standard low-resolution screens are 160 x 160 pixels, while high-resolution screens are typically 320 x 320 pixels. On devices with removable text writing areas, the screen is commonly 320 x 480 pixels in portrait orientation or 480 x 320 pixels in landscape mode, if supported. On the Foleo, the standard screen size is 1024 x 600 pixels. Images can be as large as main memory allows.
Image Depth (PalmOS only)
The image depth determines the image’s available shades or colors. Higher bit depths allow greater color flexibility, but take more memory and are slower to edit. For monochrome devices running PalmOS 4.0 or higher, the maximum grayscale depth of 4-bits is fine, but for color devices, 8-bits is recommended for speed unless working with imported 16-bit natural imagery (photos). The following formats are supported in TealPaint, but the actual depths available may be limited by device hardware or operating system versions.
1-bit (black and white)
2-bits (4 gray levels)
4-bits (16 gray levels)
8-bits (256 colors)
16-bits (65536 colors)
On the Foleo, images are always 16-bits deep.
Templates
The templates feature allows you to create an image using a predetermined image as a starting point. Templates are useful for artists and professionals who often use a common diagram, reference, or backdrop as a background for images.
To use it, create a database in RAM named “Templates” and fill it with starting images. When you later create a new image in a different database, you can choose “Use template” to select a template image as a starting point for the new image. The template can be used as is, or you can select an option to automatically create a new layer so that all new drawing will occur in a separate layer on top of the template imagery.
Moving and Converting Images
To move, delete, and convert an image to a different bit depth, first select an image by tapping on its description to activate the text cursor, and then select the appropriate choice from these drop down image menus:
Details
Shows information about the selected image
Move Up/Down/Top/Bottom
Moves the selected picture higher or lower in the image list
Copy to DB
Adds a copy of the selected image to another image database
Duplicate
Adds a copy of the selected image in the current database
Change Format
Converts an image to a different bit depth
Delete
Deletes the
selected image
Importing and Exporting JPEG, GIF and BMP Images
Using the image import/export menus, you can use TealPaint to edit or color-correct photos and other images in standard formats.
Export to JPEG/BMP/GIF
Copies the selected image to an image file on an external SD, CF, or MS storage card. This is an easy way to export images to a PC-readable format for reading in a card reader.
When
saving an image, you are a given a choice of several flavors of JPEG, BMP, GIF,
or animated GIF formats. The different
JPG formats are identical when saving to an external or internal card volume,
and are used when saving files to RAM.
Exporting to RAM is not always useful, as PalmOS requires the image be wrapped in a Palm PDB database wrapper that links it to a specific “owner” application. The different JPEG or BMP flavors let you specify the “owner” application from a list of common image-creation programs. Some owner applications may or may not still recognize a new image, however, if it maintains its own list of “loaded” databases and does not automatically scan memory for new files.
Two additional options allow customizing the image for particular formats:
Image Quality
(JPEG)
JPEG files are generally “lossy”, meaning that they approximate the original image to save storage space. This setting lets you specify how closely a saved JPEG must resemble the original source, trading off larger file sizes for better quality.
Transparent
Color (GIF)
GIF files are all 8-bits deep, so 16-bit images are automatically converted to an 8-bit Palm (web) palette when exported to GIF. When exporting to GIF, you can optionally mark one color as the “Transparent Color”. In applications that support transparency (like web browsers) parts of the image in the transparency color are treated as invisible when the image is overlaid on a background color or image.
Export to animaged GIF
Animated GIFs are similar to normal GIFs, except they contain all images in the current database. Most web browsers support animated GIFs. When you export to an animated GIF, your current animation playback speed is replicated in the animation file. If you have particularly long delays between frames, TealPaint will insert duplicated “hold” frames to mimic the same speed to work within the animated GIF file format.
Import from JPEG/BMP/GIF

This
menu reads a JPEG, GIF or BMP file into a TealPaint image database, and can be
an easy way to import PC images into TealPaint if you have an external card
reader to copies files directly to the card.
TealPaint can recognize any JPEG, GIF or uncompressed BMP files stored on an internal or external card volume, or the RAM “database” versions of these files stored by the following formats:
·
RescoViewer
JPEG
·
RescoViewer
GIF
·
RescoViewer
BMP
·
Palm
Camera JPEG
·
Zire
71 Camera JPEG
·
Sony
Clie Camera JPEG
·
Public
JPEG (copied to RAM using TealPaint or TealMover)
·
Public
BMP (copied to RAM using TealPaint or TealMover)
·
Public
GIF (copied to RAM using TealPaint or TealMover)
NOTE: On a Foleo,
there is not difference between the different “flavors” of JPEG formats.
Before importing an image,
you can select “Preview” to view a thumbnail of the image. Image previews appear in low-resolution by
default (for speed) but can be changed to high resolution in TealPaint
Preferences.
BMP images can be 1, 4, 8, or 24-bits deep, while JPEG files are always converted to 24-bit. GIFs are always 8-bit. 1 or 4-bit BMP files maintain their depth, while GIFs and 24-bit files are converted to 16-bits. 8-bit BMPs stay at 8-bits if they use a standard Palm (web) palette, but are converted to 16-bits if they use other colors.
NOTE: Under PalmOS, you can change a file from one
type of JPEG/GIF/BMP to another by selecting the file and using the Details
Screen in TealPaint. This
changes the “owner” information associated with the file, but does not modify
the file itself, so you cannot change, say, from JPEG to GIF, only between
variations of the same format.
HINT: If you run into problems with TealPaint or external programs finding a JPEG file, try moving the files to an external card where PalmOS RAM owner information will not be a confounding factor.
Special Functions
Sort Image List
Select this option to sort the images in the database by name or size.
Screen Grab (PalmOS only)
The screen grab function allows you to take a snapshot image of the handheld screen from another program and import it into TealPaint for viewing and editing. The screen grab function supports multiple resolutions and screen depths including high-resolution 16-bit images.
To grab a screen, select the “Grab
Screen” option from the drop down “Options” menu, and select a time delay value
to start the countdown timer. You can
then exit TealPaint and launch another program. When the time expires, you’ll see a popup window indicating that
the screen has been grabbed. Return to
TealPaint at that time to automatically import the grabbed screen into
TealPaint format.
Note: Grabbed 8-bit screens are assumed to use the PalmOS default system palette. If an external program changes the colors to a custom palette, incorrect colors may be grabbed.
Drawing Screen
The heart
of TealPaint’s functionality is located in its Drawing Screen. Here,
drawing tools are available to add lines, color, and patterns to images as well
as special effects.
Drawing
tools, brushes, and patterns are accessed via a Toolbar at the top of the page, while a view of the current image
appears below.
A detailed
explanation of TealPaint’s drawing tools and functions appears in the next
chapter.
Chapter 2 – Drawing
TealPaint drawing tools and options are available via a toolbar at the top of the screen. From left to right are the menu bar, tools, brushes, patterns, layers, zoom control, and undo button.
Tools
The Tool Menu
provides 20 different image drawing and painting tools.
Once
a tool is selected, tap or drag in the image area to use the tool.
Pencil ![]()
Draws a freehand line using the
current brush shape (shortcut = y)
Spotty Draw![]()
Draws a freehand trail using the current
brush shape (shortcut = j)
Curve Draw ![]()
Similar to the pencil, curve draw renders a
freehand line but averages pen movement to yield a smoother curved line on
devices with shaky pen digitizers (shortcut = J)
Line ![]()
Draws a straight line using the
current drawing brush (shortcut = n)
Constrained Line ![]()
Draws a straight line, but restricts the
angles to vertical, horizontal, or 45 degrees (shortcut = N)
Rectangle ![]()
Draws a rectangular outline in the
current drawing brush (shortcut = r)
Rounded Rectangle ![]()
Draws a rectangular outline with rounded
corners in the current drawing brush
(shortcut = q)
Circle ![]()
Draws a circle in the current
drawing brush (shortcut = c)
Oval ![]()
Draws an oval shape in the current
drawing brush (shortcut = o)
Arc ![]()
Draws an arc shaped as one quadrant of a
circle or oval. Determine the direction
of the arc (clockwise or counter-clockwise) by the direction the pen moves when
starting the curve. (shortcut = a) (New in 7.00)
Filled Rectangle ![]()
Draws a solid filled rectangle
(shortcut = R)
Filled Rounded Rectangle ![]()
Draws a solid filled rectangle with
rounded corners (shortcut = Q)
Filled Circle ![]()
Draws a solid filled circle
(shortcut = C)
Filled Oval ![]()
Draws a solid filled oval (shortcut
= O)
Filled Arc ![]()
Draws a filled arc shaped as one quadrant
of a filled circle or oval. Determine
the direction of the arc (clockwise or counter-clockwise) by the direction the
pen moves when starting the curve. (shortcut = A) (New in 7.00)
Polygon/Shape ![]()
Draws either a filled smooth shape or a
filled arbitrary multi-point polygon.
To draw a polygon, tap the pen from vertex to vertex, tapping on the
original point to close the polygon. To
draw a smooth filled shape, hold the pen down to draw a smooth filled
outline. The polygon or shape outline
can define a concave or convex polygon with points that cross. (shortcut = p)
Eraser ![]()
Erases a rectangular area to the
current background color (shortcut = e)
Paint Bucket ![]()
Fills a contiguous area of pixels
with the current color and pattern (shortcut = k)
Marquee Selector ![]()
The marquee selector tool allows you to
“draw” a rectangle to define an area to move or perform special effects. Once an area is defined, it will be outlined
by an animated box. The region can be
flipped, rotated, copied, or otherwise manipulated using menu choices, or
dragged to another area on the screen with the pen. (shortcut = m)
Lasso Selector ![]()
Like the marquee selector, the lasso
selector defines a highlighted area, but allows you to define an arbitrary
shape or polygon area. Select the area
by drawing or tapping, using the lasso tool like the polygon tool. (shortcut =
l) (New in
7.00)
Eye Dropper ![]()
The eye dropper sets the current foreground
color to an area tapped on the screen. (shortcut = i)
Text ![]()
The text tool activates an editing cursor
for adding text to the current drawing.
Once activated, text can be entered via graffiti or keyboard and will be
drawn in the current font, which is selected via the text preferences drop down
menu. (shortcut = t)
Hand ![]()
Allows you to “drag” the viewing
window to another part of an image (shortcut = h)
Blur ![]()
Blurs the area drawn beneath the pen. This tool works best in 16-bit mode, and may
not be able to find intermediate colors in 8-bit or lower modes. (shortcut =
b) (New in
7.00)
Rubber Stamp ![]()
The rubber stamp tool allows you to copy
pixels from one place on the image to another, painting with a brush to select
which pixels to copy. To use it, tap
and hold the pen still on the pixels to copy for one second until you hear a
beep (on the Foleo, you can also hold down the ALT key and click on a
location). Then start “drawing” at the
target location where those pixels should be copied. When you release the pen, the areas you painted will be replaced
by a copy of the corresponding pixels from the source location. (shortcut =
s) (New in
7.00)
Grid Snap
The Grid Snap option constrains pen
movements so they only lie on vertices of a regular grid, as if they were
lining up to intersections on an invisible sheet of graph paper. This helps one draw repeatable lines and shapes,
matching the ends of lines with each other, for instance.
Brushes

TealPaint supports
49 different built-in brush shapes for line and outline drawing tools. Filled-shape operations (line rectangle or
circle) ignore the current brush selection.
Patterns and Ink
The Patterns and
Ink window allows you to select the current foreground and background colors
(or shades) and the current drawing pattern.
Most drawing tools use the current foreground color, or both the
foreground and background colors if a pattern is active. The eraser tool always draws to the current
background color except when drawing in a foreground layer in a multi-layer
image, in which case it erases to the transparent color (white) instead.
Colors
When in color mode, the last eight colors
used appear as the first row of the color palette, followed by a gray
scale. Tap on one to set the current
foreground color, or select “background” and tap on a choice to set the
background color.
Patterns
Below the color choices are sixteen
standard TealPaint fill patterns, which are drawn in both the current
foreground and background colors.
Select a pattern to draw with that pattern using the current color. When done, select first “blank” pattern to
return to a solid color. If both the
foreground and background colors are set to the same value, all the patterns
will appear blank.
Color
Picker
To choose an
arbitrary color not in the color palette, tap on the color picker in the upper
right corner. Tap on its center to set
the foreground color, or on the outer ring to set the background color. The
standard PalmOS color picker will appear, allowing you to select a color from
the PalmOS standard palette.

When editing 16-bit images,
you can fine-tune your selection by optionally using R-G-B sliders.
Color Wheel
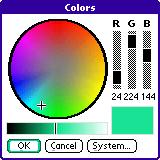
If you are editing a color image, you may also use then a TealPaint Color Wheel as a more convenient way to pick similar colors.
In this window, a color can be selected by raw Red-Green-Blue (RGB) values, or by picking it from the current color wheel and brightness controls. The color wheel shows the current selection (indicated by a plus) in a wheel of other colors with the same brightness. The spectrum of colors is represented around the wheel with saturated colors near the outer edge and less saturated colors toward the center. To change a color, simply tap on the new color in the wheel. The change to a different brightness (and update the wheel), tap on the brightness bar below the color wheel.
To use the color wheel, make sure the appropriate “use color wheel” option is set in Drawing Preferences, and the color wheel will appear instead of the system color picker, although the latter can still be reached with a System button on the color wheel screen. You may choose to use the color wheel when editing 16-bit images, when editing 8-bit images, or both.
Layers
TealPaint supports
drawing images in separate, independent layers. Similar to painting on a stack of transparent cellophane sheets,
this feature allows experimentation and movement of individual image elements
without affect surrounding areas. It
also allows one to experiment with adding image elements by making changes on a
new foreground layer, erasing the changes if needed using the eraser tool
without affecting the original image below.
To create a new layer on layer “stack”, tap
on the “New” button. A new blank
“sheet” will be added to the top of the layer stack and will be selected, ready
for painting. You can delete, rename or
move a selected layer, or use the “Merge Down” button to permanently overlay a
foreground layer onto the layer immediately below.
When painting in layers, all drawing tools
only affect the image in the active layer.
Normally, you’ll see all the layers at once, but you can check the “Show
only active layer” checkbox to hide all layers except the current active
layer. This can be useful when drawing
in a layer partially obscured by a higher layer in front.
White is used as a transparent color for
foreground layers. Therefore one
limitation is that only the background layer can contain a true white. Painting in white in a foreground layer is
equivalent to erasing that layer and will show colors from layers below.
Zoom Control
TealPaint support
five different viewing zoom levels, from a ¼x “shrunken” view to an 8x
“magnified” view. Notably, all drawing
tools are active in all zoom levels.
Zoomed-out
levels allow roughing-out an overview of images larger than one screen can
display, while zoomed-in levels allow fine details to be added to an image.
Shortcut keys:
Use ‘+’ or ‘=’ to zoom in, and ‘-‘ to zoom out.
Undo
Tap
the “Undo” button to undo the last change to an image. TealPaint supports multiple levels of undo,
so you can tap “Undo” more than once to undo multiple drawing or erase
operations.
The number of undo levels
supported varies depending on the extent of drawing operations and the size of
the undo buffer specified in TealPaint preferences.
Shortcut key: Backspace or ‘u’.
Menus
Image Menu
Prev/Next Image
Closes the current images, saving any changes and opening the preceeding/following image in the database
Clone Image
Makes a copy of the current image and inserts it before the current entry in the database
Delete Image
Deletes the current image and opens the next image in the database.
Resize Canvas
Resizes the drawing area of the current image to a specified pixel size. The image data itself is not rescaled, so if the drawing area is shrunken, some image data may be lost.
Rotate Canvas
Rotates the drawing 90, 180, or 270 degrees clockwise. (New in 7.00)
Clear Layer
Erases the current drawing layer to white.
Play Animation/Slideshow
Cycles through the images in the current database in sequence, stopping only when the screen is tapped and held.
Close
Closes the current image and optionally save changes made. This is equivalent to tapping the ‘OK’ button.
Edit Menu
Undo
Undo the last drawing change
Redo
Undo the last “undo” operation. This menu only works when the last operation was itself an undo. Once a drawing operation is made, “redo” has no effect.
Cut/Copy/Paste
Copies a rectangular area defined by the selector tool to the TealPaint image clipboard, or pastes the clipboard to the current selection. Note: these menus operate on pixels, but do not cut or paste text.
Paste Scaled
Pastes a previously copied rectangle of pixels to the selected rectangular area. If the selected area is smaller or larger than the image on the clipboard, the image will be compressed or stretched to fit.
Duplicate
Copies, scales, and pastes a selected rectangle of pixels in a single step. The duplicated area can be offset from the original by specified pixel coordinates and resized numerically and/or by a specified percentage. (New in 7.10)
Select All
Selects the current screen contents with the selector tool.
Select None
Deselects any areas selected with the selector tool.
Coordinates
Displays
the current selected area in Cartesian coordinates, allowing fine adjustment of
the selected area. When using the
lasso-selector, only the X and Y values are used.
You may also select the Scale by button to automatically shrink or enlarge the selection by a fixed percentage. This is particularly useful in conjunction with the Paste Scaled menu. (New in 7.10)
Effect Menu
Nudge Up/Down/Left/Right
Moves the pixels in the selected area by one pixel in the specified direction
Flip Vertical/Horizontal
Mirrors the pixels in the selected area
Rotate
Rotates the pixels in the selected area by 90 degrees
Fill/Erase Area
Fills the pixels in the selected area with the foreground/background color
Gradient Area

Fills a selected area with a
smooth range of pixels, ranging to and from the foreground color or background
color with adjustable transparency. You
can use this effect to do transparent fills or fancy 3D effects.
(New in
7.00)
Shape
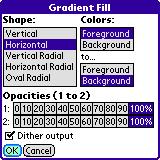
Gradient Fill supports five different shapes, which determine the direction in which colors change from the start color (1) to the end color (2).
· Vertical (top to bottom)
· Horizontal (left to right)
· Vertical Radial (center to left and right)
· Horizontal Radial (center to top and bottom)
· Oval Radial (center to edges of oval contained in selected area)
Colors
Determines the starting and ending colors (foreground or background) for each end of the gradient
Opacities
Determines the opacity (how un-transparent it is) of the fill on either end of the gradient. To do a simple fill in one color that fades away at one edge, set both colors to the same value and one of the opacities to 0. To do a constant fill with the background showing through, set both opacities to the same value somewhere in between 0 and 100.
Dither Output
When this option is enabled, pixel patterns are used to simulate intermediate colors. This is especially useful when trying to do a gradient fill in 8-bit or lower display modes.
Invert Area
Converts the pixels in the selected area to their photographic negative values
Blur Area
Blurs the pixels in the selected area
Modify Colors

Brings up the Modify Color screen, letting you color correct an image or special effects with the color palette. This screen is very useful in fixing pictures taken indoors or under poor lighting conditions.
When using this screen, a rough
preview of the image appears, showing either the entire image or a subrectangle
of that image if you’ve previously selected an area using the selector tool.
Adjust the sliders to modify the
image color balance, brightness, or contrast, and tap on OK to apply those
changes. If you change your mind
afterwards, you can use the Undo button to revert back to the original
image.
Option Menu
Drawing Prefs

The drawing preferences screen lets
you adjust several options when using the color selection screens. Drawing preference items include:
Default color picker to RGB sliders (16-bit or 8-bit)
Selects RGB sliders instead of the system palette as the default color picking mode when editing 8 and/or 16-bit images. You can choose to use the color wheel (as opposed to the system picker) only for one type of image or for both types, or never.
Show color wheel values in Hex
To aid in using the selected colors for web site development, choose this option to display the RGB color values (0-255) in hexadecimal (base 16) numbers.
Default system color picker to RGB values
By default, the system color picker comes up in palette mode, letting you choose one of the 8-bit standard system colors. Choose this option to make the color picker come up using the system color sliders. This option modifies the system color picker that comes up if you are not using the color wheel screen.
Text/Font Prefs
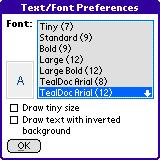
Selects the font to be used for the text
tool.
PalmOS
Install FontBucket and the included FBFonts database for additional font choices beyond standard system fonts and tiny font. (New in 7.00)
Foleo
Both standard bitmap and scalable TrueType fonts are available. When a TrueType font is selected, select or enter a font size to use.
Draw tiny size
On high resolution devices, this option draws text using the small-size versions of the system fonts, drawing the text at one-half size.
Draw text inverted
Draws text inverted, swapping the background color and foreground color.
Anim/Slide Prefs
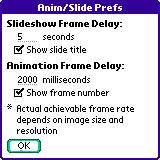
This
option allows you to set the timing when animating an image database or showing
it as a slideshow. Actual achievable
frame rate will depend on the handheld speed and the depth and size of the
images.
You can also choose options here to show each image’s title during a slideshow or the frame number during animation.
Patterns
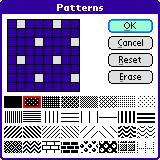
Use
the pattern editor to edit the 31 patterns available for drawing. Select a pattern to edit at the bottom of
the display and tap on the grid above to modify pixels in the pattern.
(New in 7.00)
The first pattern entry is “solid”
(no pattern) is not editable.
Toolbar
When
painting in landscape mode on a device with an expanded display, user-defined
buttons may be added to the toolbar.
For each button enter a label to be used for the custom button and
select an action to be performed when that button is selected. (New in 7.00)
PalmOS
Two additional buttons are available when running on applicable devices in 480x320 landscape mode
Foleo
Four custom buttons are available
Buttons
TealPaint uses the TealPoint Standard Button Manager to allow customers powerful control to map buttons and keystrokes to TealPaint tools, actions, and menus. By default, the following mappings are set on the Drawing Screen when the text tool is not active:
a – arc
b – blur
c – circle
d – default colors (black/white)
e – erase
h – hand
I – eyedropper
j – spotty draw
k – paint bucket
l – lasso selector
m – marquee selector
n – line
o – oval
p – polygon
q – rounded rectangle
r – rectangle
s – rubber stamp
t – text
u – undo
x – swap FG and BG colors
y – pen
A – filled arc
C – filled circle
D – default pattern (solid)
J – smooth draw
N – constrained line
O – filled oval
Q – filled rounded rectangle
R – filled rectangle
< – previous image
> – next image
. – single pixel brush
+ – zoom up
= – zoom up
- – zoom down
Backspace – undo
See the appendix for instructions on using the TealPoint Standard Button Manager.
TealPrint Screen (PalmOS)
Use this option to print the current area of the image displayed to a graphic-capable printer. TealPrint (a separate program) is required.
Toggle Silkscreen (PalmOS)
Use this option to turn on or off the full
screen (virtual Graffiti) mode on a handheld which supports an
application-controlled screen size.
Note: some devices (like the Tungsten T3) require the user manually tap on
an icon to switch the display mode and do not allow this to be done by an
application.
Chapter 3 – Tutorial
In this chapter, we’ll progress through a simple tutorial covering how to create and edit an image in TealPaint. We’ll use a number of tools and effects, utilizing a number of the program’s special features such as magnify mode and layers. Using TealPaint, a relatively complex image can be created surprisingly quickly.
Note: this tutorial assumes either a color device or a late
model handheld which supports enough gray scales shades to make a satisfactory
image.
Step 1 – Create and open a new database
From
the TealPaint “Main File Screen”, tap on the “New” button to create a
new image database. If an expansion
card is present, make sure the RAM device is selected to minimize image loading
and saving times.
With the “Open” action selected, tap on the database name to open the database for editing.
Step 2 – Create and open a new image
Tap
on the “New” button on the Image Screen to create a new blank image. On color handhelds, create an 8-bit image,
while on monochrome device, choose the highest grayscale depth available
(typically 4-bit). Tap on the “Screen
Size” button to select a screen-size image, and tap “OK” to create the image.
Once
the image has been created, tap on the square-shaped thumbnail image on the
left of the description to open it in the Editing Screen.
Step 3 – Set the foreground color to color blue using the color menu
Tap
on the “color/pattern” button (the fifth button from the right) to select an
initial drawing color. At this time,
tap on a dark blue (or dark gray if on a monochrome handheld to select it as
the current foreground color.
Step 4 – Select the curve draw tool
Tap
on the tool-select button (seventh from the right) and tap on the
squiggle-shaped curve tool in the second row from the top and second column
from the left.
Step 5 – Draw a waterline using the curved line tool
Holding
down the pen on the screen, draw a curvy line from the left hand side of the
screen to the right. If you make a
mistake, tap on the “Undo” button (second from the right) and try again. Make sure there are no gaps in the line on
either side of the screen. If there
are, fill them in with other short lines.
This is important for the next step.
Step 6 – Fill below the waterline using the paint bucket

Tap
on the tool-select button and select the paint bucket too (top row, second from
the left). Then tap on the lower half
of the screen to fill it with blue.
Only the area below the screen should now be blue. If the whole screen is blue, there must be a gap on either side of the screen. If this happens, tap on the “Undo” button and return to step 4 to fill the gap before proceeding.
Step 7 – Fill the sky with light blue

Return
to the color/pattern menu and select a lighter blue color, then tap in the
upper half of the screen to the new color.
Step 8 – Set the foreground color to beige using the system color picker

Reopen the color menu, but this time we’ll want to pick a color that’s probably not in the default color list. Tap on the center of the color picker in the top right corner of the color menu. The center of the color picker should be light blue from the previous step.
Select a light beige sand color for the next step.
Step 9 – Select and draw an island using the polygon/shape tool
Select the
“C”-shaped polygon/shape tool and draw a wide oval in the lower half of the
screen.
Step 10 – Add a new layer
For
the next steps, we’ll want to be drawing in a new foreground layer so we won’t
disturb the background we’ve already drawn with any changes we might make.
Tap
on the layer-select button (fourth from the right) and tap “New” to create a
new layer. Name it “Foreground.” Make sure the new layer is highlighted
before tapping “OK”. The layer button
should now read “2” instead of “1” to indicate that the second layer is now
active.
Step 11 – Draw a tree trunk using the polygon tool
Select
a medium brown color and draw a tree trunk in the middle of the island using
the polygon tool.
Step 12 – Draw coconuts using the filled circle tool
Select
an orange color and the filled circle tool from the fourth row and third column
of the tools menu.
Draw three circles near the top of the tree trunk with the circle tool. Tap on the image where you want the center of each circle to go and drag the pen outwards until the circle grows to the size you want.
Step 13 – Draw leaves using the polygon tool
Use
the polygon tool to draw leaves on the tree in one or two green shades.
Draw each leaf individually using fairly wavy
curved lines.
Step 14 – Enclose the tree using the selector tool
Choose the selector tool (fifth row, third column) and box a
region around the tree. The highlighted
area will be shown with an animating rectangle.
Step 15 – Move the tree using the selector tool
Drag the tree to the left by tapping in the center of the
selected area and dragging to the left.
Note that when you release the pen, only the tree itself stays
moved. The background water and island,
residing on a different layer, remain unaffected because they are on another
layer.
Step 16 – Copy the tree to the clipboard
With the tree selected (reselect it if it is not), copy the tree to the clipboard using the “Copy” drop down menu.
Step 17 – Add a new intermediate layer
Create a new layer using the layer menu and name it
“Middle”. Move it below the foreground
layer by tapping the “Move Down” button.
Make sure it is selected before tapping “OK”.
Step 18 – Paste a smaller copy of the tree

Use the selector
tool to highlight a region to receive another tree, and choose “Paste Scaled”
to insert a tree shrunken down to fit the new rectangle.
Step 19 – Add a title using the text tool
Select
the text tool (fifth row, fourth column) and tap near the bottom of the screen
where the title should be added. Enter
characters using Graffiti or your handheld’s keyboard, if applicable.
Step 20 – Add a sun using the circle tool
Select a circle tool and draw a circle for the sun in yellow. If the sun appears intersects with a tree, make sure you draw it in the background layer so it appears behind the tree.
Step 21 – Merge layers

Once you are satisfied with the layout of the image layers, merge them back into a single layer. Do this by going into the layer menu, choosing a foreground layer, and tapping on “Merge Down” to write that layer onto the layer below. Repeat until only one layer is left.
Step 22 – Select the tree brown color using the eye dropper
Select the eyedropper tool (fifth row, second column) and
tap on a tree to set the current foreground color to the tree color.
Step 23 – Swap the foreground/background colors and select pattern
Open the color
picker and tap on the “Swap” button to set the foreground color to the picked
tree color. Then select a lighter brown
for the foreground color.
Once
that is done, reopen the color menu, if necessary and select the darker (light
brown on dark) brick pattern.
Note:
some operations, such as dragging selected areas with the selector tool, erase
to the background color. The background
color should be returned to pure white before doing this or similar operation
on a foreground layer, as pure white is used as the transparent color for these
layers.
Step 24 – Magnify details using the zoom control

Use the zoom control (third from the right) to zoom into the image for better detail viewing. Choose 2x or 4x for now.
If necessary, use the hand tool or 5-way scroll buttons to position the image so that a tree trunk is viewable.
Step 25 – Draw highlights using the curve draw tool
Draw highlights on the trunks using the curve draw tool. The lines will be drawn using the current pattern and colors, which should add texture to the tree trunks.
Step 26 – Add details and finishing touches
Using
the tools you’ve already used, you can add finishing touches such as shadows,
birds, clouds, monkeys, and other details.
Feel free to experiment, and most of all, have fun!
Chapter 4 – Editing External File Formats
While TealPaint allows you to manually import and export images to standard file formats such as JPEG, GIF, and BMP, you can also transparently edit these files using TealPaint’s automatic import/export feature. (New in 7.00)
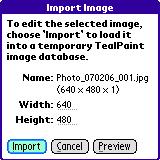
To edit a JPEG or similar file, simply “Open” it in the main TealPaint screen. You’ll be presented with a screen where you can preview the image or import it into the TealPaint drawing screen.
At this time, you can also optionally scale down the image as part of the import process. This is helpful when trying to edit a large image (greater than about 1-2 Megapixels on most PalmOS devices) that ordinarily might not fit into working memory. Be aware that if you save your edits that the saved file will reflect this reduced resolution.
After making your edits and closing out of the drawing screen, you’ll be given an option of saving the changes back to the original file or to a new file in a different name and/or format.
Chapter 5 – Tips and Tricks
Below are hints on using TealPaint effectively and solving some of the “gotchas” commonly encountered using the program.
Using External Storage Cards under PalmOS
TealPaint supports viewing and editing images directly off SD, CF and other external storage cards as well as in main memory. This can save on main memory usage when dealing with many pictures. The PalmOS database file format, however, was not designed with write-ability in mind, and can be very slow to save changes when a database starts getting large. To avoid unnecessary wait times, try to limit card-based databases to either images that (like photos) you don’t normally need to edit, or small databases of only a few images.
Using Layers
Use layers liberally to give you maximum flexibility when manipulating objects. Remember to name the layers so you know what goes on what. When you’re satisfied with particular portions of the image, however, merge layers together to minimize storage space and maximize drawing speed. Remember that true white (color 0) is used as the transparent color for foreground layers, and thus you should keep your background color set to color 0 most of the time when drawing in foreground layers.
Drawing Large Text
If
you are running on a high-resolution handheld, you can set “Tiny Mode” in text preferences to utilize
the device’s internal low-resolution fonts to give you an extra set of
half-size fonts.
If you need to render bitmap fonts larger than normal size, however, there is another simple trick you can use. When painting in one of the zoomed-out magnification levels, drawing is actually done internally on a screen-sized bitmap, and this is scaled up to fit the whole image canvas. Thus, if you draw text in a zoomed-out (1/2 x or 1/4 x modes) the text will be drawn at screen resolution and automatically scaled up 2x or 4x when applied to the image. The ROM fonts are bitmap fonts, however, so you might still want to zoom in and touch up the “jaggies” in the scaled up text after drawing it.
Text drawing also supports patterns, so with a little creativity, you can use patterns to generate interested “ghost” text or similar effects.
Drawing Polygons and Shapes
The Polygon/Shape tool is our favorite. Using it in shape mode, it can make a few crudely drawn squiggles look like modern art. Remember though, that it has two modes, and that by tapping on the screen instead of drawing, you can create precise solid areas delimited by straight-line segments. You can even start a region in polygon mode and drag the stylus to finish it in shape mode.
Using Blur with transparent layers
The TealPaint Blur effect, like all effects, only modifies the current layer. When editing on a foreground layer, keep in mind that the transparent portions of the image appear as pure white (color 0) and that this will be picked up by the blur tool if you blur a foreground object that shares an edge with a transparent area. You can avoid this by using the paint bucket to temporarily filling the transparent area with a shade similar to what is underneath the foreground object and filling it back to color 0 afterwards.
Animation Speed
When creating images for animation, keep in mind that images cannot play back any faster than they can load. To maximize playback speed, minimize the image sizes and color depths used.
High-resolution images are four times larger and 4 times slower than an equivalent low resolution image. 16-bit images are twice a slow as 8-bit ones. On a high-resolution device, if you create images at ½ resolution (typically 160x160), they will automatically be scaled up 2x during playback but will load 4 times faster than a 320x320 image.
Collapse any layers in the images to increase speed further, and play the animation from RAM instead of an external card if possible.
Chapter 6 – TealPoint Image Manager
The TealPoint Image Manager (IMAGEMGR.EXE) is a Windows utility included with TealPaint for PalmOS. It replaces the TealPaint Image Manager that accompanied older versions of TealPaint. While you can now import and export JPEG and BMP images directly inside TealPaint, you can also use the TealPoint Image Manager to import or export images to or from TealPaint-format databases, view them on the desktop, or print them to a Windows printer.
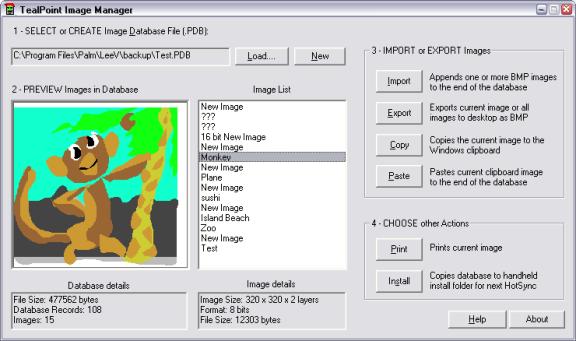
Step 1 – Select a Database File
You can create a new TealPaint-format database, or find the backup of an existing one created on your handheld. Click on “Load” or load an existing database or “New” to create a new one.
When you HotSync your handheld, TealPaint
image databases are automatically backed up to a folder called “BACKUP”
which in turn resides in a folder named after your handheld’s Hotsync User Name in the Palm install folder.
For instance, if your user name is “John Smith”, the backup
folder would be in another folder named “SmithJ”. The backed-up files are named the same as
the databases on the PalmPilot, but have a '.PDB' extension, like “PICTURES.PDB.”
NOTE: All
PalmOS database files
have a “.PDB” file extension. If you
find an image database on, say, a website that also has a .PDB extension, it
may not be (and probably is not) in TealPaint format, so don’t be surprised if
the image manager cannot load it.
Step 2 – Preview images
Once a database is loaded, you can view any of the images in the database. Scroll the Image List to see the list of images by selection. Tap on a name to see that image to the left.
Step 3 – Import or Export Images
Importing an Image
Click on “Import” to import images from .BMP format. You can also click “Paste” to import an image copied to the Windows clipboard from another program or captured using the PrintScreen button. The Image Import window will appear, with a preview of how the image will appear.
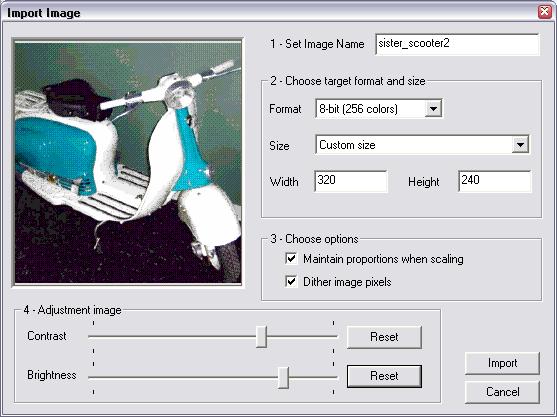
On this screen you can set the target bit depth and image size of the
final imported image, and also adjust the brightness and contrast of the
converted image. Two options are also
present:
Maintain proportions when scaling
When setting image sizes or fitting the image to a screen size, this option makes sure the image’s aspect ratio remains intact. When this option is not set, you’ll be free to stretch the image vertically or horizontally out of shape.
Dither image pixels
Allows the program to using patterns of similar colors to simulate the presence of intermediate colors. This option can greatly enhance the appearance of photographic images in grayscale or 8-bit modes.
Importing Multiple Images
When selecting a .BMP image to import, you can actually use the SHIFT button to choose more than one image at a time if they reside in the same folder, and import them in one step into the TealPaint image database.
When you do so, the first image selected will appear as normal, but a new “Import All” button will appear in the lower right. Click on it to import all the images together using the same settings, or “Import” to import only the first image and reopen the Import window with the next image selected.
Exporting Images
Click on the “Export” button to export one or more images to .BMP format, or “Copy” to export the currently selected image to the Windows clipboard so that it can be pasted into a PC-based paint or other program.
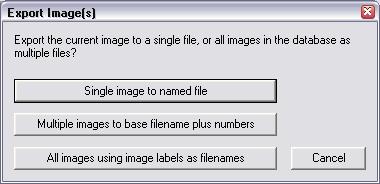
You have three export choices:
Single image to named file
The current image shown in the main window will be exported to a .BMP file you specify
Multiple images to base filename plus numbers
All the images in the database will be exported in order as numbered files. You specify the base filename, after which three numbers will be added. For instance, if you specify “Fred.bmp”, the actual files will be named “Fred000.bmp”, “Fred001.bmp”, “Fred002.bmp”, and so on.
All images using image labels as filenames
All images in the database will be exported using each image’s name as its filename. The Image Manager will add the .BMP extension as necessary, and will add “[2]”, “[3]”, etc to images whose names conflict with existing files or previous images. You specify a default filename to be used for files with no description or whose name consists of invalid Windows filename characters.
Step 4 – Other Actions
Printing an Image
Click on “Print” to print the current image to your Windows printer.
Install Database
Once changes have been made to a database, you need to “install” the changes to copy them back to the handheld. This is true even if the file exists in the user backup folder, as the Palm Desktop will not automatically mirror the changes back. In fact, it is even more important to install a database here, as the backup file will get overwritten if the database is modified on the handheld.
You can use the Palm Install Tool in the Palm Desktop program to install the databases, or tap on the “Install” button in the Image Manager to automatically install the current database for you.
NOTE: Never make changes to the same database (or databases of the same name) on both the desktop and handheld at the same time. The entire database is backed up when changes are made on the handheld, and entire databases (not just individual images)completely overwrite the same file on the handheld when you install them.
Appendix A – TealPoint File List
File
Lists
TealPoint standard File Lists are standard elements in new
TealPoint applications. They provide a
crucial building block missing from PalmOS, that of a consistent, standard
interface for navigating device and folders and selecting individual files.
File lists display relevant files in a particular storage device,
folder, and category, along with optional icons and typically additional
information, such as the file size in kilobytes.
Navigation
Use the up and down scroll buttons to page through the list of
items, and tap on a file to select or activate it. Typing a letter or writing it with Graffiti will seek the list to
the next entry starting with that letter.
The Standard File List also supports navigation via
device-specific controls, including:
Palm
5-way Control
Use the select button to highlight the top
file in the list. Once an entry is
highlighted, the scroll buttons can move the current selection up and
down. A second press of the select
button will activate (open) the selected file or folder.
Clie
Jog Dial
An inward press of the jog dial selects a file entry, while scrolling the jog
dial up and down changes the highlighted entry. The jog back button, if
present, moves up one folder in the directory structure if the current location
is within a sub-folder. In the root of
a device, or on a device, like RAM, which does not support folders, the back button acts normally, returning to
the application launcher screen.
Accessory
Keyboards
On a PC simulator or add-on accessory
keyboard, the up, down, left, and right
arrow keys function as Palm 5-way control buttons, while the enter key acts as select. The backspace key
navigates to the parent folder.
Categories
Categories, if supported, allow manual
sorting of individual files.
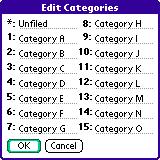
You can select or
edit categories by tapping on the category selection button in the upper right
hand corner of the screen. The count of
items present in each category appears in parentheses next to each category name. Categories are supported for files present
in both RAM and flash memory, and can be named from the Categories drop down menu.
Flash
Memory
Internal
Flash
A dot indicator appears to the left of a
file’s name to indicate any files which are installed in ROM or PalmOS-formatted
flash memory such as a Visor Flash module or unused operating system flash
memory. Files in these internal
locations are generally read-only and cannot be modified or moved into
categories.
External
Flash
External VFS (Virtual File System) flash
card storage devices, such as Memory Stick, Compact Flash or SD/MMC cards are
supported by the TealPoint File Lists if appropriate to the application.
When a
VFS-compatible card is detected, an extra row of icons will appear along the
top of the File List for navigating to folders on the external device. On the left are the device icons, used to
select the current card or location to list files. The first icon is the memory icon, and is followed by a numbered
card icon for every expansion card found.
Most devices will support at most one
external storage card, and will thus only have one card icon. The Handera 330, however, can support two
simultaneous data cards; so two card icons can be present if both slots are
occupied, or if a device has more than one driver installed for a single card
slot.
To show the files on an external card,
simply tap on the corresponding card icon.
External file devices support a hierarchical folder system, which are
fully supported to help organize files.
If sub-folders are present in the current
folder, simply tap on them to move “down” into the sub-folder to see its
contents. To the right of the device
icons is a display showing the current directory on the card, followed by two folder
navigation buttons. Use the first parent
icon to move up one level to the folder that contains the current folder. Tap on the rightmost root or home icon to move all the way back up to
the topmost folder.
Appendix B – TealPoint File Manager
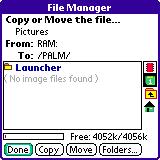
When a “Move” action is available in a
TealPoint File List, the TealPoint standard File Manager provides a consistent
interface for copying or moving files.
Moving/Copying Files
The TealPoint Standard File Manager allows
you to copy or move the pre-selected file from one folder or device to
another. The contents of a target
location to receive the file appear in the lower half of the screen. Simply select the destination device and
folder using the file list and device/navigation icons, and tap on the Copy or Move buttons to start.
Files may be copied between RAM and external storage cards, or between
folders on the same storage card. The
target location must differ from where the source file already exists. Note that items in the list are not
selectable, but are present to indicate contents which may already be present
in the target location for the pre-selected file.
Note that operations are limited to what
is supported by the installed hardware and system software.
Palm
Memory
PalmOS memory does not support folders,
and can normally only hold PalmOS-specific resource (.PRC) and database (.PDB)
files. Desktop-specific files (such as
.WAV, .TXT, etc.) can normally only be stored on external expansion cards, or
if copied to RAM, are typically not recognized by applications.
MemPlug
The system software MemPlug expansion
Springboard modules does not support the VFS-standard interface for moving of
files between Cards and RAM, but third-party add-ons such as the Kopsis
Engineering VFS library can add this capability.
Sony CLIE
Sony CLIE handhelds running older versions
of the PalmOS system software (prior to PalmOS 4.0) do not support copying
files to any folders outside the root standard “MSSONY” folder. Subfolders can be freely made and used within
the MSSONY folder however.
An additional Folder button is present for creating and deleting folders. If the current target is on a device which
supports folders, tap on it to either delete the current folder location (if it
is empty) or create a new subfolder in the current target location.
Appendix C – TealPoint Button Manager
Description
Accessible from a “Buttons” menu options, the TealPoint standard Button
Manager provides a powerful and flexible interface for customizing the hardware
button and key mappings for TealPoint applications. Mappings can be individualized for different locations (screens)
in the application, and mappings can be created to support new buttons,
jog-dials, and directional pads on future devices.
Changing Default Mappings
To modify the
mappings for a particular screen, first select the screen from the pick list of
locations at the top of the screen. A
list of mappable buttons/controls appears on the left. When an item is selected, its corresponding
action is shown on the right. To change
a mapping, simply select the new action when the key or button is highlighted.
Creating New Mappings
To create a mapping for a new key or button which is not listed, tap on
the New button to bring up the custom
code dialog. Press the button or
control to be mapped, to capture the character its corresponding PalmOS key
codes, and tap OK to create the
key.
Note: Only keys
which generate a standard PalmOS key code can be mapped. Some keys (like shift keys on some device
keyboards) are handled in hardware and cannot be mapped.
Appendix D – TealPoint Pen-Free Navigation
TealPoint Pen-Free Navigation provides access to almost all programs screens and functions via keyboard or device 5-way rocker pad. Similar to the 5-way interface on the Treo 600, TICL pen-free navigation also adds similar functionality to older PalmOS handhelds with directional pads or devices with add-on keyboard peripherals.
Pad Navigation
With 5-way controls, a current button, checkbox, or text field control is highlighted in blue-green or drawn bolded in monochrome handhelds. The current control is changed by presses of the directional pad, which moves the selection to a control in the general direction of the button press. The center “select” button will activate the highlighted control, pressing buttons, toggling checkboxes, or turn on or off the cursor in a text entry field.
On some devices, like the Treo600, the direction pad is mapped in the operating system to move the cursor in an active text field. When this is the case, the direction pad will move the cursor by default, but will change the active control selection once the cursor has reached the end of the text field and can move no further in that direction.
Keyboard Navigation
With an add-on keyboard (or the Foleo built-in keyboard), arrow keys replace the directional pad of a 5-way control. To select a control, the Enter key may be used, except when the text cursor is active in a multi-line text field. When this is true, the Enter key will enter a line break into the text field instead.
Accelerator Keys
On screens without text entry fields or other elements which accept keystroke input, buttons may also support an accelerator key which may be pressed to simulate a press of the key. When this is the case, the letter is shown underlined in the button.
Appendix E – Compatibility Notes
Image
Formats
TealPaint Image Databases are compatible with other TealPaint
programs such as TealDoc, TealLock, TealInfo, and TealNotes. For versions of programs released prior to
January 2004, however, images must be 160x160 or smaller and 8-bits or lower in
depth to be recognized. These programs
will be updated as necessary and appropriate to support high-resolution images
as part of their normal upgrade releases.
TealPaint is not compatible with Imageviewer files or other
proprietary formats commonly found on the Internet, dispite their .PDB file
extension. “PDB” stands for “Palm
Database”, and is the extension used for *ALL* PalmOS database files, no matter
what their format or purpose is on the handheld. If you download an image file and install it on the handheld but
TealPaint cannot find it, chances are that it is not a TealPaint file.
Macintosh
TealPaint is fully compatible with the Macintosh, as it runs entirely on
the Palm regardless of whether it is installed from a PC or a Mac. The conversion utilities included in the
base archive are Windows-only, however, as we are not Macintosh programmers and
are not in a position to make a full Macintosh utility.
Check the TealPaint page on the TealPoint web site for a Mac-classic
version of our basic (and definitively non-mac) command line utility PICUTIL,
which may be usable as a basic file converter.
You may also be able to use the Windows version of IMAGEMGR or PICTUTIL
under a Windows emulator.
Use as an
external editor
TealPaint supports a simple calling
convention that allows it to be used as an external editor for other programs,
opening a TealPaint database for editing, and returning to the original host
when done. TealNotes uses this
mechanism to edit images with more tools than the standard TealNotes set. Visit the TealPoint software “developers”
page (www.tealpoint.com/developr.htm) for more information on adding this
feature to your own programs.
Appendix F – Using PicUtil
For performing batch operations, PicUtil, a simple command-line utility is also included. A version of PicUtil is also available for Macintosh classic computers.
PicUtil performs many of the same operations as the TealPoint Image Manager, but using a primitive keyboard-based interface.
Interactive Mode
When you run PicUtil, you will be presented with a text menu of operations to perform. Enter the letter of an operation to perform.
C:\WINDOWS>picutil
-----------------------------------------------------
PICUTIL Image management utility for TealPaint
Version 6.00.00, Jan 1 2004
(c)1998-2004 TealPoint Software, All Rights Reserved
-----------------------------------------------------
Menu:
(L) = List images in TealPaint database
(N) = Create new TealPaint database
(I) = Import a BMP image to a TealPaint DB
(E) = Export a BMP image from a TealPaint DB
(Q) = Quit
Please Enter Selection->
After you select a
choice, you’ll be asked for any other necessary information to complete the
operation. In the example below, you
need to enter the path to an image database to list. Typically, it’s best to copy the database to the same folder as
PicUtil before running the utility.
Then you can simply enter the name of the database instead of describing
a directory path to it.
Please
Enter Selection-> l
Enter TealPaint .PDB file to list (in this folder or
use full path) ->pictures.pdb
5
Record(s) Found
0 . (160 x 146) 8857 bytes, 256 colors: Summit (8-bit)
1 . (160 x 146) 5044 bytes, 16 colors: Summit (4-bit)
2 . (160 x 146) 2283 bytes, 4 colors: Summit (2-bit)
3 . (160 x 146) 1128 bytes, 2 colors: Summit (1-bit)
4 . (160 x 146) 13295 bytes, 256 colors: Space Cowboy
When done, you can choose the “Q” option to quit PicUtil, or the close menu on the Macintosh version.
Batch Mode
PicUtil supports batch-mode commands for automating common conversion operations. For a full list of batch commands, run PicUtil from the command line with the “/?” parameter. Batch mode does not apply to the Macintosh, of course, which does not have a command line interface.
P:\tealpnt\picutil>picutil
/?
-----------------------------------------------------
PICUTIL Image management utility for TealPaint
Version 6.00.00, Jan 1 2004
(c)1998-2004 TealPoint Software, All Rights Reserved
-----------------------------------------------------
Usage: PICUTIL
[<options>]
where <options> =
-l <.pdb file> = List images in TealPaint database
-n <.pdb file>
=
Create new TealPaint database
-e <.pdb file> <.bmp file> <index> = Export
BMP image from TealPaint DB
-i <.pdb file> <.bmp file> = Import BMP image to TealPaint DB
Appendix G – Products
Products Visit us online
for our complete product line, including:
SHORTCIRCUIT ( http://www.tealpoint.com/softshrt.htm )
A new twist on gameplay fused from your all time action puzzle favorite games,
connect falling conduit pieces into explosive loops in this frantic race
against the clock.
SUDOKUADDICT ( http://www.tealpoint.com/softsudo.htm )
Sudoku Addict brings to your handheld the addictive worldwide puzzle craze that
has displaced crossword puzzles in many newspapers in Great Britain and Japan.
TEALAGENT ( http://www.tealpoint.com/softagnt.htm )
Get news, movie times, stock quotes, driving directions, web pages and more
without need for a wireless connection. TealAgent fetches and formats web-based
content for offline viewing.
TEALALIAS ( http://www.tealpoint.com/softalia.htm )
Free up memory and make the most of external expansion cards. Placeholder
'Alias' shortcut files automatically find, load, and launch apps and data from
external SD cards, increasing free main memory.
TEALAUTO ( http://www.tealpoint.com/softauto.htm )
Track and graph automobile mileage, service, and expenses with TealAuto, the
complete log book for your car or any vehicle. Extensive customization options
and unmatched in features and functionality.
TEALBACKUP ( http://www.tealpoint.com/softback.htm )
Backup your valuable data with TealBackup, supporting manual and automatic
backups to SD/MMC/CF cards and Memory Stick, backups through HotSync, and
optional compression and encryption.
TEALDESKTOP ( http://www.tealpoint.com/softdesk.htm )
Launch applications with TealDesktop, the themed replacement for the standard
system launcher screen with tabs, multiple card folders, drag and drop, and
more
TEALDIET ( http://www.tealpoint.com/softdiet.htm )
Shape up your life with TealDiet, the diet, exercise, and personal tracking
application for mobile devices. Lose weight, build more muscle, and live
healthier with TealDiet.
TEALDOC ( http://www.tealpoint.com/softdoc.htm )
Read, edit, and browse documents, Doc files, eBooks and text files with
TealDoc, the enhanced doc reader. Extensive display and customization options;
TealDoc is unmatched in features and usability.
TEALECHO ( http://www.tealpoint.com/softecho.htm )
Improve your Graffiti text input speed and accuracy, seeing what you write with
TealEcho digital "ink". No more writing blind!
TEALGLANCE (
http://www.tealpoint.com/softglnc.htm )
See the time, date, upcoming appointments and todo items at power-up with
TealGlance. The TealGlance pop-up utility and key guard comes up when you power
up, letting you see your day "at a glance."
TEALINFO ( http://www.tealpoint.com/softinfo.htm )
Lookup postal rates, area codes, tip tables, schedules, airports, and info from
hundreds of free TealInfo databases. Create you own mini-apps; a handheld
reference library.
TEALLAUNCH ( http://www.tealpoint.com/softlnch.htm )
Launch applications instantly with the TealLaunch pop-up launcher and
button/stroke-mapping utility. Map applications to button presses and pen
swipes so you can get to your apps quickly.
TEALLOCK ( http://www.tealpoint.com/softlock.htm )
Secure and protect your handheld with TealLock, the automatic locking program
with encryption and card support. TealLock has unmatched features and
customization options for personal or corporate use.
TEALMAGNIFY ( http://www.tealpoint.com/softlens.htm )
Save your eyesight with TealMagnify, an ever-ready magnifying glass that works
with most any program. TealMagnify lets you enlarge the screen for those times
the text is too small to read.
TEALMASTER ( http://www.tealpoint.com/softmstr.htm )
Replace Hackmaster with TealMaster, the supercharged 100%-compatible system
extensions manager. TealMaster adds enhanced stability, configuration and
diagnostic features and PalmOS 5.0 hack emulation.
TEALMEAL ( http://www.tealpoint.com/softmeal.htm )
Save and recall your favorite restaurants with TealMeal, the personal
restaurant database. With TealMeal's handy sorting and selection options, never
ask "where to eat" again.
TEALMEMBRAIN ( http://www.tealpoint.com/softmemb.htm )
Stop crashes and monitor your memory use with TealMemBrain, the application
stack stabilizer. TealMemBrain boosts your stack space on OS3 and OS4
handhelds, eliminating causes of system instability.
TEALMOVER ( http://www.tealpoint.com/softmovr.htm )
Beam, delete, rename, and copy files with TealMover, the file management
utility for SD/CF/MS cards. TealMover lets you see, move, modify, hex edit, and
delete individual files.
TEALMOVIE ( http://www.tealpoint.com/softmovi.htm )
Play and convert high-quality video and synchronized sound with the TealMovie
multimedia system. TealMovie includes a handheld audio/movie player and a
Windows AVI/MPEG/Quicktime converter program.
TEALNOTES ( http://www.tealpoint.com/softnote.htm )
Insert freehand graphics anywhere with TealNotes "sticky notes" for
Palm OS. TealNotes can be inserted into memos, to-do lists, address book
entries--almost anywhere you currently have editable text.
TEALPAINT ( http://www.tealpoint.com/softpnt.htm )
Paint, sketch, or draw with TealPaint, the all-in-one mobile graphics paint
program and photo editor. Highlights include 25 tools, 32 patterns, 49 brushes,
zoom, layers, undo, & JPEG/GIF/BMP support.
TEALPHONE (
http://www.tealpoint.com/softphon.htm )
Supercharge the address book with TealPhone, the contacts replacement with
superior interface and options. Highlights include enhanced display, search,
phone-dialing, groups, and linking.
TEALPRINT ( http://www.tealpoint.com/softprnt.htm )
Print text and graphics to IR, serial, and Windows printers with TealPrint.
With numerous connection options, TealPrint, is the all-in-one text and graphic
printing solution.
TEALSAFE ( http://www.tealpoint.com/softsafe.htm )
Store your passwords, credit cards, PIN numbers, and bank accounts in the
TealSafe data wallet. With maximum security and encryption, TealSafe is a must
for features and security.
TEALSCAN ( http://www.tealpoint.com/softscan.htm )
Keep your PDA or Smartphone healthy, clean, and fast with TealScan, the system
maintenance utility. Use TealScan to fix crashes, find updates, and keep your
device running smoothly and efficiently.
TEALSCRIPT ( http://www.tealpoint.com/softscrp.htm )
TealScript adds Graffiti text input to Treo and Centro smart phones. For
devices that already support Graffiti, TealScript adds a trainable system that
supports both multi-stroke and Graffiti-1.
TEALTRACKER ( http://www.tealpoint.com/softtrac.htm )
Track time and expenses with a fast, easy to use interface that requires
minimal effort. Generate reports and export data to a spreadsheet. TealTracker
is your personal time clock.
TEALTOOLS ( http://www.tealpoint.com/softtool.htm )
Improve productivity with TealTools pop-up Palm Desk Accessories. TealTools
includes a popup calculator, clock/stopwatch, preferences panel, editing panel,
memopad, and a file/backup manager.
Appendix H – Revision History
Version 7.11 - April 21, 2008
·
Added workaround for bug in TX to re-enable full screen mode icon
in landscape mode after system mistakenly disables it
·
Added preference option to select 'Auto' mode for system fancy
fonts (leaves buttons bold)
Version 7.10 - November 14, 2007
·
Added automatic snapping of pen coordinates when drawing in
magnified view to provide more accurate drawing preview.
·
Added new "scale" button to numerical coordinates screen
to ease proportionally scaling image selections
·
Added new 'duplicate' menu to copy and paste current selection
with scaling/shifting in one step
·
Added new improved visual style; skinny fonts and shaded buttons
·
Added preferences option to enable/disable new fancy (thinline)
system fonts
·
Added support for high resolution button icon images on Sony CLIE
handhelds
·
Fixed copy and paste to correctly copy very small selections
·
Fixed cursor positioning after dismissing popup tips in older
PalmOS 3/4 devices
·
Fixed display of 1, 2, and 4-bit images on Palm LifeDrive and TX
·
Fixed display updating in landscape mode on Palm LifeDrive and TX
·
Fixed display updating restoring graffiti area on Palm LifeDrive
and TX
·
Fixed line drawing preview to correctly show filled lines instead
of wireframes on low resolution devices
·
Fixed low-resolution jpeg image previewing
·
Improved export menu to remember last export format, device, and
path
Version 7.02 – August 24, 2007
·
Fixed backwards slash brushes that were mistakenly all the same
size
·
Fixed crash after playing image animation from image thumbnail
screen
·
Fixed 5-way nav on font select screen
Version 7.00 – July 24, 2007
·
Added arc tool
·
Added filled arc tool
·
Added blur tool
·
Added rubber stamp tool
·
Added lasso selector tool for selecting, moving, and processing
effects on freehand and polygon regions
·
Added gradient fill effect with five shape options and translucent
shading ('gradient fill' menu item)
·
Added keyboard shortcuts for drawing tools (customize in 'buttons'
menu item)
·
Added toolbar buttons for wide displays (customize in 'toolbar'
menu item)
·
Added pattern editor (customize in 'patterns' menu item)
·
Added rotate canvas function ('rotate canvas' menu item)
·
Added larger brush sizes (now 49 total)
·
Added fill patterns (now 32 total)
·
Added support for FontBucket add-on fonts (FontBucket program and
sample fonts now included in zip file)
·
Added preference option to locate undo/working buffers on SD card
·
Added tip screens explain confusing options
·
Added 'screen' button on canvas resize screen
·
Added ability to simultaneously resize images when importing
·
Added ability to directly open and edit raw image files (just tap
on them) using automatic import/export to/from a temporary database
·
Added ability to abort image import operation
·
Improved undo/redo to restore previous marquee selections (lasso
selections are not saved)
·
Improved image restore to automatically reload recovered images
(if found) after reset/crash
·
Improved rotate-area effect to rotate around center of selection
·
Fixed format (depth) conversion to correctly handle multi-layer
images
·
Fixed file list display to show size of last active database
·
Fixed drawing tools to align properly when drawing in zoomed out
display modes
·
Fixed high resolution image previews to draw properly
·
Fixed circle tool when drawing very large circles to still be
circular
·
Fixed crash merging layers on image less than 160 pixels wide
·
Fixed crash when drawing in odd-width images (not multiple of 8)
·
Fixed crash drawing immediately after resizing canvas down
·
Fixed realtime drawing preview when drawing circles or lines on
devices that don't support direct screen access
·
Fixed ability to create files on Handspring Visor Memplug memory
modules
·
Fixed UI element colors on PalmOS 3.1 devices
·
Fixed screen refreshing on PalmOS 3.x devices
·
Fixed importing of 32-bit BMP files
·
Fixed importing of Bitfield-encoded BMP files
·
Fixed importing of Paletted 1-bit and 4-bit BMP files
·
Fixed importing of RLE8-encoded BMP files
·
Fixed progress indicator when importing image files wider than
1000 pixels
·
Fixed image corruption when importing images wider than 1000
pixels
·
Fixed updating of display and toolbar after hiding/showing
inactive layers Fixed importing of 24-bit bmp files
Version 6.62 – February 6, 2007
·
Fixed importing of 24-bit bmp files
Version 6.61 – July 11, 2006
·
Added support for importing GIF files
·
Added support for exporting GIF files (converted to Palm/Web
palette)
·
Added support for exporting GIF animations
·
Added preferences option to show imported image previews in high-resolution
·
Added preview button to image import screen
·
Fixed ability to cancel exporting image to database
Version 6.57 – March 22, 2006
·
Fixed preview function to correctly scale 8-bit BMP image files
Version 6.56 – March 8, 2006
·
Added "nudge" buttons to add or subtract 5 from each
slider in color modification screen
·
Added "nudge" buttons to add or subtract 5 from each
slider in color selection screen
·
Added "nudge" button to brightness bar in color picker
·
Fixed saving of files in BMP format (last version would
incorrectly save in JPG format instead)
·
Added option to separately only color and/or brightness when
inverting a selected area
Version 6.53 – February 15, 2006
·
Fixed rotation tool to work with selections wider than 64 pixels
·
Fixed database details screen from modifying database type and
creator (which hid databases)
Version 6.52 – February 5, 2006
·
Added ability to directly import and export JPEG files to and from
image database
·
Added ability to browse or import JPEG and BMP images from main list
screen
·
Added ability to adjust the color balance or brightness and
contrast of an image or selected area (menu)
·
Added automatic edge pen-snap on high-resolution devices to allow
drawing all the way to right and bottom edges of the display
·
Added numeric tagging of number entry fields throughout program
(auto num-shifts on treos)
·
Added support for accessing hidden internal card volumes (where
images are stored on a treo 650)
·
Added hot-scrolling to file dialog screens
·
Added missing text edit menus to windows with text entry fields
(as per Palm style guidelines)
·
Added missing shift indicators to windows with text entry fields
(as per Palm style guidelines)
·
Improved (greatly) speed of saving images to SD cards
·
Fixed system incompatibilities with z22 handheld
·
Fixed crash when flood-filling a shape with the same color in
16-bit mode
·
Fixed crash when trying to flood fill an overly-complex shape
(stack overflow)
·
Fixed saving of changes to image descriptions before deleting or
duplicating an image
·
Fixed selection of menus using 5-way select button
Appendix I – Contact Info
TealPaint
by TealPoint Software
©1999-2008 All Rights Reserved.
TealPoint Software
TealPaint for PalmOS/Foleo
454 Las Gallinas Ave #318
San Rafael, CA 94903-3618
Please visit us at www.tealpoint.com,
or email us at support@tealpoint.com.
We look forward to hearing from you.
Appendix J – Registering
Registering allows you to use the program past the 30 day
expiration period and turns off registration reminders.
Currently, you may register by snail mail or online with a
credit card and a secured server from the store where you downloaded the
software. For the first option, send
the following information on a sheet of paper separate from your payment.
§
Product Name
§
E-Mail Address
§
HotSync User ID (Pilot Name
Required for Passkey generation. It can be found on the main screen of the
HotSync application on the Pilot as "Welcome ________" or in the
corner on a PalmIII or higher)
§
Check (drawn off a US Bank) or
Money Order for ($19.95 US).
No
international checks or money orders please.
Appendix K – Legal Notice
We at TealPoint Software are
committed to providing quality, easy-to-use software. However, this product is
provided without warranty and the user accepts full responsibility for any
damages, consequential or otherwise, resulting from its use.
This archive is freely
redistributable, provided it is made available only in its complete, unmodified
form with no additional files and for noncommercial purposes only. Any other
use must have prior written authorization from TealPoint Software.
Unauthorized commercial use
includes, but is not limited to:
§
A product for sale.
§
Accompanying a product for
sale.
§
Accompanying a magazine, book
or other publication for sale.
§
Distribution with
"Media", "Copying" or other incidental costs.
§
Available for download with
access or download fees.
This program may be used on a
trial basis for 30 days. The program will continue to function afterwards.
However, if after this time you wish to continue using it, please register with
us for the nominal fee listed in the program.
Thank you.
CUSTOMER LICENSE AGREEMENT
YOU ARE ABOUT TO DOWNLOAD, INSTALL, OPEN OR USE PROPRIETARY SOFTWARE OWNED BY TEALPOINT SOFTWARE, INC. CAREFULLY READ THE TERMS AND CONDITIONS OF THIS END USER LICENSE BEFORE DOING SO, AND CLICK BELOW THAT YOU ACCEPT THESE TERMS.
1. License. You are authorized to use the Software Product owned and developed by TealPoint Software, Inc. on a single hand-held computing device on a trial basis for thirty (30) days. If after 30 days you wish to continue using it, you are required to register with TealPoint and pay the specified fee. This license is not exclusive and may not be transferred. You may make one copy of the Software for back-up and archival purposes only.
2. Ownership. You acknowledge that the Software Product is the exclusive property of TealPoint Software, Inc, which owns all copyright, trade secret, patent and other proprietary rights in the Software Product.
3. Restrictions. You may NOT: (a) decompile or reverse engineer the Software Product; (b) copy (except as provided in 1 above) sell, distribute or commercially exploit the Software product; or (c) transfer, assign or sublicense this license.
4. Disclaimer of Warranty and Liability. TEALPOINT MAKES NO WARRANTY, EXPRESS OR IMPLIED, AS TO THE ACCURACY, COMPLETENESS OR FUNCTIONING OF THE LICENSED SOFTWARE, INCLUDING WITHOUT LIMITATION, WARRANTIES OF MERCHANTABILITY OR OF FITNESS FOR A PARTICULAR PURPOSE, ALL OF WHICH TEALPOINT DISCLAIMS. ALL LIABILITY IS DISCLAIMED AND TEALPOINT ASSUMES NO RESPONSIBILITY OR LIABILITY FOR LOSS OR DAMAGES OF ANY KIND, DIRECT OR INDIRECT, INCIDENTIAL, CONSEQUENTIAL OR SPECIAL, ARISING OUT OF YOUR USE OF THE LICENSED SOFTWARE, EVEN IF ADVISED OF THE POSSIBILITY THEREOF.
5. Termination. You may terminate this Agreement at any time by destroying your copy(ies) of the Software Product. The Agreement will also terminate if you do not comply with any of its terms and conditions, at which time you are required to destroy your copy(ies) of the Software Product and cease all use.
6. Applicable Law. This Agreement is governed by the laws of the State of California.