
TealInfo
User's Manual
Program Version 4.39
Last Updated: May 31, 2006
Table of Contents
Introduction
Contents
Installation
Chapter 1 – Getting Started
Introduction
Using the Program
Chapter 2 – Managing Folios
Categories
Folios
Images
Menus
Backing up files
Setting Preferences
External Media Devices
Managing Files
Chapter 3 – Browsing Folios
Menus
Folio Controls
Chapter 4 – Using Included Folio Files
Chapter 5 – Downloading More Folios
Chapter 6 – Creating New Folios
Compiling a Folio
Additional Resources
TealInfo Dev Kit
Previewing Folios
Source File Format Overview
Defining Objects
Comments
Example
Advanced Features
Placing Objects
Specifying Default Filenames
Adding Inline Font and Underline Styles
Adding Inline Hyperlinks
Creating Scrolling objects
Linking Objects
Using Text Resources
Creating Password-Protected Folios
Using TealInfo for Forms Applications
Using MATH Objects
Using DRAW Objects
Appendix A – MkTlInfo Object Reference
Basic Display Objects
WINDOW
POPWINDOW
LABEL
RECT
IMAGE
POPIMAGE
Interactive Selection Controls
LIST
POPLIST
TABLE (New in 4.0)
POPTABLE (New in 4.0)
OUTLINE
POPOUTLINE (New in 4.0)
CHECKMARK
CHECKLIST
Data Entry Controls
EDITWINDOW
POPEDIT
INPUT (New in 4.0)
Data Processing Controls
POPMERGE (New in 4.0)
PRINTMERGE (New in 4.0)
MATH (New in 4.0)
Graphics Controls
DRAW (New in 4.0)
POPDRAW (New in 4.0)
Special Controls
GOTO
POPFIND (New in 4.20)
SETPAGE (New in 4.0)
TRES
RANDOM (New in 4.0)
YEAR (New in 4.0)
MONTH (New in 4.0)
DAY (New in 4.0)
HOUR (New in 4.0)
MINUTE (New in 4.0)
PASSWORD
GRAFFITI
Appendix B – MkTlInfo Field Reference
BFONT (value)
BTEXT (string)
BX (value)
BY (value)
BW (value)
BH (value)
CYCLE (value)
DELAY (value)
DATABASE (string)
DEFAULT (value)
DECIMALS (value)
DIGITS (value)
FONT (value)
KEY (keyword)
LINKS (value) (value).
MAXVAL (value) .
PAGES (value1) (value2)…
RECORD (value)
STYLE (keyword) (keyword).
SX (value)
SY (value)
TABS (value)
TARGET (string)
TEXT (string) (string).
X (value)
Y (value)
W (value)
H (value)
Appendix C – MkTlInfo Style Reference
Text Alignment
Appearance
User Interface
Special Styles
Appendix D – Products
Appendix E – Revision History
Appendix F – Contact Info
Appendix G – Registering
Appendix H – Legal Notice
Introduction
Thank you for trying
TealInfo, the powerful information database and reference application for
PalmOS.
Contents
This archive contains the
following files:
Program
files: TEALINFO.PRC The TealInfo program
file
MKTLINFO.EXE The TealInfo folio creation utility
TPSETUP The
TealInfo easy-installer (for Windows)
Document
files: INFODOC.PDF This manual in Adobe Acrobat (PDF) format
INFODOC.HTM This manual in HTML
format (sans images)
INFODOC.PRC This
document in TealDoc format
REGISTER.HTM TealPoint
Registration form in HTML format
REGISTER.TXT TealPoint
Registration form in text format
Sample folios: SALESTAX.PDB Sales
Tax Calculator folio
TIPS.PDB Tip
Calculator and Guide folio
METRICON.PDB Metric converter folio
TODOLIST.PDB Handy,
configurable to-do list folio
PHONEBK.PDB Handy, configurable phone book folio
INFOREF.PDB Reference folio for folio development
INFOREF.TXT Source text file for reference folio
Bonus folios:
USPOSTGE.PDB US Postage rates folio
8BALL.PDB Magic fortune-telling folio
BMI.PDB Body-Mass Index calculator
folio
ELEMENTS.PDB Periodic table of elements folio
RGBTOY.PDB Color selection tool
PINOUTS.PDB Folio of common computer connector
pinouts
Download
other folios for free from www.tealpoint.com
Installation
Windows:
Use the
TealPoint setup installer by double clicking on the TPSETUP.EXE
installer program, and following the on screen prompts.
Other Systems:

Use the Palm
Installer (Quick Install) to install the program file TEALINFO.PRC. It will appear on the Palm Computing device after the
next HotSync.
This manual is also provided in this
archive as the PalmPilot document INFODOC.PRC,
which can be viewed with our application TealDoc.
Instructions
on how to use the Palm installer are in the Palm Handbook that came with your
Pilot, PalmPilot, Visor or WorkPad.
Folios Files:
To use the program, you'll also need to
install some folio files, available on the TealPoint website at
www.tealpoint.com MemoWare (www.memoware.com).
Included
in this archive are a few sample reference folios. Use the Palm Installer to install these files.
See
the section 'Included folios' below for more information.
Chapter 1 – Getting Started
Introduction
![]()
Use TealInfo to open and read interactive documents called
“folios”. TealInfo Folios are like
mini applications, displaying data in tables, lists, and windows that are
linked together with advanced user interface elements such as outlines, images,
forms, hyperlinks and popup lists.
Folios can be
downloaded from the ever-growing library of available titles (most are free),
or created from scratch using a text editor and the command-line utility
MkTlInfo. Folios can be easily created
with the included tools and a text editor, but build powerful screens that look
and feel like custom applications.
Advanced
developers can use TealInfo to create their own reference tools, calculators,
and mini applications, all with no programming.
Using the Program
TealInfo is easy to use, and consists of
two basic interface screens, the Folio List Screen and the Folio
Browsing Screen.
The Folio List
screen lists the folios installed on the handheld, and allows you to move and
manage them.

The Folio Browsing screen, on the
other hand, displays an interface defined by the folio that you have opened for
viewing.
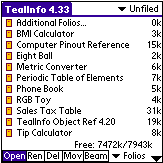
Chapter 2 – Managing Folios

The Folio List Screen, appears when you first run TealInfo.
On it is a list of all the installed folio files in the current category.
Categories
Select
or edit categories by tapping on the category selection pick-list in the upper
right hand corner of the screen.
Folios
Tap
on a listed folio to open or modify it. T o select which action is performed,
tap on the corresponding action-selection buttons at the bottom of the screen
before clicking on an entry in the list.
By doing this, you can open the folio, rename it, change its
category/location, or delete it permanently from memory.
Images
You can also
perform similar operations with TealPaint-format image files by changing the
"Info" pick-list at the bottom right from “Folios” to
"Pic". These picture
databases are sometimes bundled with folios to be used as source imagery for
the folio. If you choose to “open” a picture database, TealPaint will
automatically be started if it is installed on your organizer. You'll need to
manually load up the correct image database, however.
Menus
The
following functions are accessible from the Folio List screen using the system
menu button in the silk-screened Graffiti writing area or device status bar:
Backing up files
During HotSync, the Palm Desktop program automatically maintains a
backup of files that have their PalmOS “backup bit” set. Files backed up in this way can be restored
if you lose power to your handheld.
The Backup All in List
menu turns on the backup bits for folios listed in the current category. This
forces the folios to be backed up into your backup directory each time you
HotSync. Choosing Backup None in List,
on the other hand, resets all the bits to zero. After HotSyncing to back your
files, you'll probably want to reset the bits, or the Palm HotSync system will
scan the file looking for changes every time you HotSync, slowing down your
HotSync sessions.
Setting Preferences
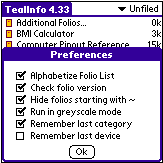
The following options can be set under the
"Preferences" menu item.
Alphabetize Folio List
By
default, the folio list is sorted alphabetically. You can turn off this feature
to increase response time if you have many folios installed.
Check Folio
Version
By
default, TealInfo will automatically check the version numbers of any folios
you open, warning you if any were made with a newer version of TealInfo. You
can turn off this feature, but note that you may encounter unpredictable
results running newer folios with an older copy of TealInfo should the new
folios require features not supported in your version.
Hide Folios Starting with ~ (tilde)
In
certain applications it may be desirable to create a series of interlinked
folios where some of the sub folios are hidden from view and only accessible
from other folios. To do this, name the folios starting with a tilde character
(~) and set this option in preferences.
Run in Grayscale Mode
When set,
this option runs TealInfo in grayscale mode on a monochrome handheld instead of
the default black and white mode. When
color TealPaint images are displayed in folios with this mode on, they are
automatically converted to shades of gray.
TealInfo support a four-shade grayscale mode on basic PalmPilot models
and a 16-shade grayscale models running OS 3.3 or higher.
Remember Last Category
When set,
TealInfo remembers the last category you were viewing and returns to it the
next time to run the program.
Otherwise, the current category is reset to “All” each time you return.
Remember
Last Device
When used with external storage cards, TealInfo returns to the last device visited each time you visit the program. When this option is turned off, TealInfo always starts in RAM.
External Media Devices
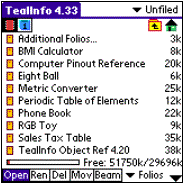
TealInfo supports reading folio files
directly from external storage cards.
NOTE: Supported devices
include the Sony Memory Stick, Palm SD/MMC cards, and both the Compact Flash
(CF) and SD/MMC slots on HandEra organizers.
In addition, support has been added for Portable Innovation MemPlug
Springboard modules and Kopsis Engineering’s add-on VFS library.
When a card is detected, an extra row of
icons will appear along the top of the Folio List Screen. On the left are the device icons, used to
select the current card or location to list files. The first icon is the memory icon, and is followed by one
numbered card icon for every expansion card found. Most devices will support at most one
external storage card, and will thus only have one card icon. The HandEra 330 and Tapwave Zodiac
handhelds, however, can support two simultaneous data cards; so two card icons
can be present if both slots are occupied.
To show the files on an external card,
simply tap on the corresponding card icon.
External file devices support a hierarchical folder system, which
replaces the Palm category system.
Thus, the “category” selector in the upper right corner disappears and
is replaced with a “folder” button when an external card is selected. The “Beam” button also disappears, as files
can only be beamed directly from internal memory.
If sub-folders are present in the current
folder, simply tap on them to move “down” into the sub-folder to see its contents. To the right of the device icons is a
display showing the current directory on the card, followed by two folder
navigation buttons. Use the first parent
icon to move up one level to the folder that contains the current folder. Tap on the last root icon to move all
the way back up to the topmost folder.
Managing Files
To copy or move files between categories
in RAM, or to move them between RAM and an external card or between folders on
the same card, tap on the Mov pushbutton and tap on the name of the file
to move or copy. Either the RAM File
Manager or Card File Manager window will open, depending on your
current device.
RAM File Manager
The RAM file manager allows you to change
the category of a Folio stored in RAM.
If the expansion device supports VFS, then you can also copy or move the
file to the external card. When either
option is selected, the file is moved to the last card and sub-folder viewed.

NOTES: The MemPlug system software does not support the VFS-standard
interface for moving of files between Card and RAM, so the move-to-card options
will not be available when directly accessing a MemPlug device.
Also, Sony CLIE handhelds running older
versions of PalmOS, moving files is permitted; copying files outside the
standard “MSSONY” folder, however, is not.
Sub-folders can be made and used within the MSSONY folder however.
Card File Manager
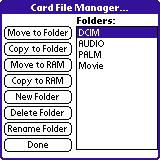
The card file
manager window is similar to the RAM File Manager, except that the list of
categories is replaced with a list of folders in the current location.
A current (.) entry in the list
indicates that you want to copy a file into the listed location. If the current
location is not the Root of the card, then additional parent (..) and root
(\) folders also appear in the list.
These folder entries allow you to select a location in which to copy or
move the selected file. To change the
current location, double-tap on the folder entry.
On VFS-systems, Move to RAM and Copy
to RAM options appear. To move or
copy a file, select the target location in the folder list and tap on the move
or copy button.
An additional three buttons for creating,
deleting, and renaming folders is also present in the card file manager. These three options can also be reached by
tapping on the folders button on the Folio List screen. Care should be used when deleting folders,
because if non-folio files are present in the folder, they will not be listed
in TealInfo and can be accidentally deleted.
Some VFS implementations will delete a folder even if it is not empty,
while others will simply not delete the folder.
NOTE: Move operations
are not supported directly by the MemPlug system software. Also, the Sony CLIE version of VFS does not
support copying files outside the MSSONY folder. Lastly, only Palm-format files can be copied or moved to
RAM. Text files and other non-palm
files cannot be stored in RAM.
Chapter 3 – Browsing Folios

When you open a folio
for browsing, you are brought to the folio-browsing screen, whose
interface depends on the folio. The one common element is the close button in
the upper right corner of most folios, but some may override this button as
well. In any case, you can always close a folio and return to the Selection
Screen by selecting the Close menu
item.
Menus
Details
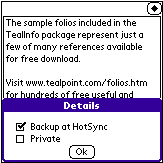
The Details window
allows you to set two parameters for the current folio. The Backup bit determines whether the file
is backed up during each HotSync, while the Private
item determines whether the file is listed in the folio Section screen when
private records are globally hidden in the Palm security settings.
Checkmark All /
Checkmark None
Sets or clears, respectively, all entries
in presently shown CHECKMARK and CHECKLIST items. Use this to quickly reset or
set a commonly used task list, for instance.
Folio Controls
TealInfo
folios can have many interface elements already familiar to PalmPilot owners.
These include:
Lists

Vertical lists of selectable
elements, scrollable with a scroll bar if there are too many selections to fit
on one view.
Tables
Tables
resemble lists, but display information on a grid. While lists can contain columns that look similar to tables,
tables allow the selection of a single rectangle in the grid, while lists
always select the entire row.
Windows
Freely
wrapping scrolling text windows
Checkboxes
![]()
Lists with selectable boxes for each item
Popup Lists

Fields that show the current selection but pop
up a selection list when you click on them.
Edit fields
![]()
Regions where you can click inside and enter or
edit text. Unlike the system equivalent, these may take on more advanced
formatting when not being edited.
Outlines
Like lists, but featuring an outline-like tree
hierarchy, subsections of which can be collapsed (hidden) or expanded (shown) under
user control. To expand or contract an outline item, tap on the control
triangle next to the item name.
Popup Windows
Pushbuttons
that bring up a window of text when tapped.
Goto Buttons
Buttons
that open up another folio, if present, Doc files in TealDoc, Movie files in
TealMovie, or open databases in other supporting applications.
Print Buttons
Buttons
which output textual data or report to a supported printing through the program
TealPrint.
Images
Picture
imbedded in a folio or stored from TealPaint image databases
Popup Images
Pictures
that display themselves when a button is tapped
Animations
Page-flipped
images, providing simple cycling animation.
Cycling Text
Windows
with changing text messages for warnings or advertising messages.
Passwords
Ability to ask for passwords when entering a
folio for security or registration purposes.
Hyperlinks
Specially
marked text that you can tap on to jump to other folios or popup windows,
pictures, and lists.
Object Linking
Ability to link the
contents or behavior of a window, image, or list to the current selection of
one to eight other lists, outlines or checkboxes.
Chapter 4 – Using Included Folio Files
A
number of folios are included with TealInfo.
These are just a small sample of the folios available. A huge library of additional folios is
available for free download online from tealpoint.com.
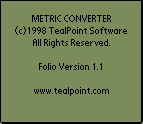
METRICON
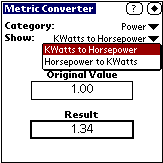
A metric conversion folio. Choose conversion
type and units from the popups at the top of the folio to display an appropriate
conversion table.
SALESTAX

A simple calculator for sales taxes from 3-11%
in ¼ percent increments. Choose your tax rate from the popup and pre-tax
subtotal in the list on the left.
TIPS
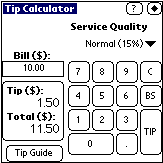
A simple tip calculator, choose the pre-tax
total from the left to calculate an appropriate tip. Also includes a helpful tip guide giving general guidelines for
common situations.
USPOSTGE
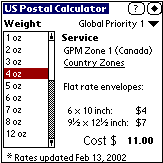
A US postage calculator which calculates USPS
First class, Priority Mail, and Express Mail postage, as well as international
letter postage including Canada and Mexico.
BMI
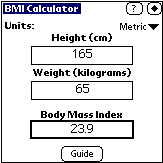
Calculate your Body Mass Index (BMI), an
indicator for weight status in adults.
This tool supports both Imperial English and Metric units and includes a handy chart to evaluate
your results.
ELEMENTS
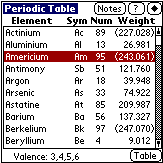
Data from Periodic Table of Elements, including
symbol, atomic number, atomic weight, and valence. Also includes simple popup graphic table.
PINOUTS
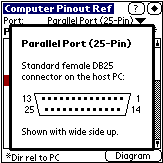
Pinout reference tables for PC cards, devices,
and connectors. Includes pin
designations, connector types, and pin assignments. Updated to include USB, Cat-5 Ethernet, and connector diagrams.
8BALL
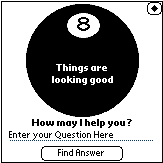
Answer
any of life's questions (the yes/no ones, anyway) with this magical artifact of
70's era technology.
RGBTOY
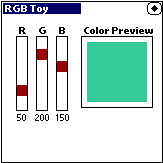
Preview
the simple RGB colors supported by TealInfo 4.0's new drawing functions. Also demonstrates interactive sliders and
drawing in TealInfo.
INFOREF.PDB
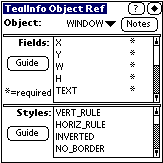
This folio provides a useful quick reference for
building TealInfo folios. It lists the
FIELD and STYLE tags supported by each TealInfo object. Chose an object type
from the popup list at the top of the folio. Its corresponding FIELDS and TAGS
will appear in the windows below.
TODOLIST.PDB
A handy
to-do list folio. Click on the 'Edit' button to insert your own entries.
Unchecked items appear on lines preceded by a minus (-), while checked-off
items are preceded by plus (+) signs. A line with neither symbol will simply
appear as an un-checkable label. To load more than one copy of this folio,
rename the original folio on the Folio Selection Screen and use the Palm
Install tool to install the TODOLIST.PDB file again.
PHONEBK.PDB
A handy
phone book folio. Click on the 'Edit' button to edit the current page of phone
number entries. Use a single tab stroke to separate data intended for each nine
and the 'return' stroke to separate lines. Change the list of categories using
the 'categories' button, entering each category on a separate line.
Chapter 5 – Downloading More Folios
Countless
other folios are available for free download from TEALPOINT.COM. A sampling of a few popular titles include:
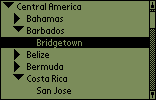
World Reference
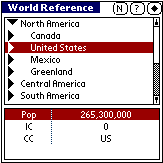
Folio of very useful
information about countries and cities around the world. Lists city, longitude,
latitude, time zone, and phone prefix.
Area Codes
Look up Area codes by code both forwards and reverse
by region. Covers current US area codes and special prefixes.
Horoscope
A complete overview of the 12 zodiac signs in the
Zodiac. Get personality profiles, favored elements, ruling planets, chosen
stone and lucky colors, all in one handy folio.
Anniversary Gifts
Folio to help keep track of what to get your spouse
on a given anniversary. Returns both modern and traditional themes for
anniversary gifts given the correct number of years.
Conversion Factors
A large collection of conversion factors for various
units.
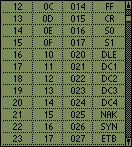
ASCII Character Sets
This folio shows the following ASCII character sets:
DOS, WIN (Windows-32 Ariel), POS (Palm OS font 0)
JavaScript Reference
Reference for JavaScript 1.2 object properties,
methods, and events.
Craps Odds
The odds for different bets on a Craps table, and the
result of any given roll on each bet.
Ham Radio UHF/VHF Band Plan
A handy folio for Ham Radio hobbyists, listing the
allocated VHF and UHF frequencies from 60 Meters to 10.5 Ghz.
Immunization Guide
An immunization guide with information on the 1999
AAP immunization schedule, plus info on each of the vaccines. It now has the
year 2000 American Academy of Pediatrics immunization recommendations. For more
info, visit the Pediatric Pilot Page at
http://www.keepkidshealthy.com/pedipilot.html.
ICD-9 Diagnosis Codes
Demo of the commercial
folio STAT ICD-9 Coder. Also available at
http://www.statcoder.com/ICD9/icd9.zip.
Lab Values
Common medical lab values for hormones, fluids, etc.
It can be used by MD's, EMT's, nurses, or anyone attempting to read their
medical chart.
Dirt/Stone Construction Calculator
An invaluable construction calculator that computes
the volume of dirt or weight of sand, stone, gravel, crusher run, or rip rap
needed to fill a specified area to a required depth. A must for architects,
contractors, or other construction professionals. Supports both Imperial and
Metric units.
Compressible Flow
Compressible flow tables for both 1-D isentropic flow
and 1-D normal shock flow. This folio should be a useful reference for
engineers and scientists working in the field of compressible gas dynamics.
F1 GrandPrixInfo
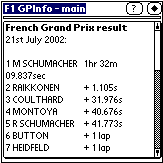
A main folio and sub-folios
for TealInfo giving information on teams, circuits, drivers and current
championship standings for the current Formula 1 season. The sub-folios contain
information on the history of results for Grand Prix races and the drivers' and
constructors' championships; driver, team and circuit details.
Airports
Folio listing worldwide airports, their location and
abbreviation.
Chapter 6 – Creating New Folios
Like
TealDoc files, TealInfo folios are created first as text files that then get
converted to a pilot-recognizable format using a conversion program. For
TealInfo folios, the MkTlInfo conversion tool is included for this purpose.
Compiling a Folio
On a PC, run MkTlInfo from a DOS box with the following
format:
MKTLINFO
<input text file> <output .PDB file> <folio title> <image
database>
If any of the file names or titles has spaces, they should be
enclosed in quotes. The image database (optional) is the name of a TealPaint
image database in the current folder to insert into the folio to be used as an
embedded source of imagery.
You can also run MkTlInfo without arguments and you’ll be prompted
to input the necessary file names.
Additional Resources
TealInfo Dev Kit
If
you're planning to make your own folios, we recommend downloading the TealInfo
Dev Kit, available on our web site. It contains sample source text files and
documentation to help in making folios, as well as a folio decompiler for
reverse-converting unprotected folios.
Previewing Folios
When
making a folio, you'll no doubt need to quickly preview changes, particularly
when positioning on-screen objects. We recommend using POSE, the Palm OS
Emulator, or the Palm Simulator, both available at Palm's web site
http://www.palm.com. This program simulates a Palm organizer on your computer
desktop, allowing you to nearly instantly load new version of a folio for quick
previewing.
Source File Format Overview
Defining Objects
MkTlInfo takes plain text files with the
following basic format: Objects are defined by a line with the name of the
OBJECT, followed by lines containing FIELDS describing the object. Each field
is followed by one or more VALUES on the same line, though TEXT fields may have
VALUES on subsequent lines as well. VALUES can be numbers, expressions,
keywords, or quoted text, depending on the type of FIELD.
(OBJECT1) (ID)
(FIELD1) (VALUE1A) (VALUE1B...)
(FIELD2) (VALUE2A) (VALUE2B...)
...
(OBJECT2) (ID)
(FIELD1) (VALUE1A) (VALUE1B...)
(FIELD2) (VALUE2A) (VALUE2B...)
...
where
(OBJECT) is a keyword defining an on-screen interface element such as a list,
label, or button, and (FIELD) is the name of an adjustable parameter for that
object. Each (FIELD) is followed by one or more values, depending on the
particular (FIELD). Refer to the
appendix for a full listing of supported objects and how to define them.
Comments
Comment
lines are indicated with a pound (#) sign.
Any lines beginning with a ‘#’ are ignored by the folio converter.
Example
This example creates a simple form with one scrolling
object:
#
# This is a simple scrolling list
#
LIST
X 10
Y 20
W 140
H 130
TEXT "The Man Trap"
"Charlie X"
"Where No Man Has Gone Before"
"The Enemy Within"
"Mudd's Women"
"What are Little Girls Made of?"
"The Naked Time"
STYLE HRULE
FONT 1
Advanced Features
Placing Objects
Coordinate System
Objects
are placed on screen using x,y coordinates relative to the upper left corner of
the browsing window. They are placed in
PalmOS “standard” coordinates, which map a range of values 0 to 160 in either
direction in a standard square screen.
Objects have an x,y position and a width and height, which you set using
the following tags:
X Y W H
Coordinates of the current object (must be defined on a previous
line to be used)
BX BY BW BH
Coordinates of the current object's activation button
Relative Coordinates
When
placing objects in a folio, you’re not limited to using just numbers. You can use simple math expressions and can
even define an object's coordinates relative to another object, making them
easy to align or move as a group. To help do so, numerical values can be
entered as simple math expressions, and a number of predefined symbols can be
used in the expressions, substituting for numbers:
PREVX PREVY
PREVW PREVH
Coordinates of the previous object
PREVBX PREVBY
PREVBW PREVBH
Coordinates of the previous object's activation button
Example:
For
instance, to define a column of checkmark objects, one might write:
CHECKMARK
X 10
Y 15
W 100
H 12
TEXT "One"
CHECKMARK
X PREVX
Y PREVY+12
W PREVW
H PREVH
TEXT "Two"
SPECIAL
NOTE: mathematical expressions used for coordinate positioning currently
supports five operators: addition (+), subtraction (-), multiplication (*),
division (/), and modulus (%). Expressions are evaluated strictly from left to
right, currently ignoring any mathematical precedence rules. Thus, 2+3*5 is
evaluated as 25, not 17.
Specifying Default Filenames
Three special tags exist which don’t affect the
contents of the folios directly, but rather are used to pass parameters and
file names to MkTlInfo, so they don’t have to be specified every time the folio
is compiled.
While
images for IMAGE and POPIMAGE objects can remain as separate TealPaint
databases, it's often more convenient to ship a folio as a single file with the
images imbedded inside. An entire TealPaint image database can be included
inside a folio with PNTFILE tag. For example,
PNTFILE PICTURES.PDB
will
imbed the image database "Pictures.pdb" (should be in the current
folder) into a created folio. Any references to the picture database by IMAGE
or POPIMAGE objects should then use the name of the folio as it appears on the
PalmPilot instead of the image database name. Only one picture database can be
imbedded in a folio.
MkTlInfo
supports the use of special tags in the source file to pre-specify output and
database (as seen on PalmPilot) file names. This latter name is especially
important if the database is required to have a specific name because it's
referred to by links from other folios or from internal references to imbedded
TealPaint images.
Examples:
OUTFILE
MYFOLIO.PDB
OUTNAME "My little folio"
Adding Inline Font and Underline Styles
TealInfo
supports changing fonts and underlining inside a body of text for a WINDOW or
POPWINDOW object. Other objects may be less predictable. Font changing is done
via HTML-like tags imbedded with the text of the object. For best results, font
and underline tags should not bridge lines of the text. For example:
TEXT
"This is
some <$FONT=1>bold</$FONT> text."
"This is some <$UNDERLINED>underlined</$UNDERLINED>
text."
The
<$FONT> tag selects a font,
while the </$FONT> tag reverts
it back to the original font. Unlike HTML, tags of the same type cannot be
nested, so a </$FONT> tag will
always revert back to the original font, even if preceded by two <$FONT > tags.
Note
that the original font defined in the object definition governs the spacing of
text in a TealInfo object. Thus, you usually don't want to change fonts to one
taller than the original font, or subsequent text lines will clip that text.
Adding Inline Hyperlinks
You
can also insert hyperlinks in text to open a named folio or activate a named
button to pop up a window or picture. For example:
TEXT
"Just tap
<$LINK="My Folio"><$LINK="My Index Folio">here</$LINK> to go to the index folio."
"Just tap <$LINK="Info"><$LINK="Info">here</$LINK>
to show more information."
The link text
can be the name of a folio to open or the name of a button to activate. The
actual text of the button should be included, not the button object’s name in
the source file. Note that you can place the button entirely off-screen by
using large coordinates (such as BX=200 BY=200), leaving the hyperlink as the
only way to activate it.
Creating Scrolling objects
TealInfo
supports scrollable, oversized, text and image objects. The oversized width of
text objects are defined by creating columns wider than the objects, while
heights are defined by the number of lines of content. Image widths and heights
are defined by their source imagery. To
create a horizontally scrolling WINDOW object, use the TABS field to create a
column wider than the object itself.
WINDOW
X 10
Y 10
W 50
H 50
TABS 75
TEXT
"This is an example of
a text window with" \
"horizontal scrolling"
Text
objects appear with on-screen scrolling bars. In addition, for both types of
objects, mapping the hardware up/down scrolling buttons can do scrolling and/or
combinations for the four application launch buttons to vertical and/or
horizontal movement. This is done using
one of the BUTTON_SCROLL style flags.
By
mapping scrolling behavior to different buttons for different objects, some
folios can be made which operate largely pen-free.
Linking Objects
LINK
fields are one TealInfo’s most powerful features. They allow you to control one object with another, and are
typically used to create category pick lists and similar controls.
Adding
a LINK field to an object allows that object to take on alternate contents
depending on the current selection (value) of one or more other objects. For instance, to make a WINDOW object take
on different contents depending on the selection of a category LIST, you add a
LINK object to the WINDOW, passing it the name of the LIST object that controls
it. For clarification purposes, we
refer to the controlled object as the “child” and the controller object as the
“parent”. A child object links back to
each of its parents.
Defining
alternate contents in child
The
child object should contain multiple TEXT fields, each with different
content. By linking that object to
other objects, the actual TEXT block used will depend on the selections of the
controlling objects.
Naming
parent objects
To
link to a parent, first identify the objects you're linking-to by giving each
of them a unique ID name (with no spaces) following the object tag. For
instance, the following identifies a list object as a parent object called
'choice_list'.
LIST choice_list
X 5
Y 5
...
Linking to parent objects
Then, refer to this parent object in the child object using
the LINKS tag
WINDOW info
LINKS choice_list
TEXT "text one"
TEXT "text two"
TEXT "text three"
A
child object can only be linked to parent objects that appear before it in
a source file. The child object must also have enough TEXT fields defined for
it to handle all of the possible selections of its parents.
Calculating
which TEXT object is used
The
TEXT field that is actually used at any given moment is determined by the
current selections of all of its parents, multiplied out using the formula
(example for 3 objects):
index = ((valueA * maxB) + valueB) * maxC +
valueC
where
maxA,maxB,and maxC represent the respective number of selections parent objects
A, B, and C can take on. This
guarantees that for any combination of valueA, valueB, and valueC, a unique
TEXT object will be selected. In this
example, you must have (maxA * maxB * maxC) number of TEXT fields defined to
cover all the possible values of the three parent objects.
Simple Example:
LIST id_difficulty
X 90
Y 15
W 60
H 100
TEXT
"Easy"
"Hard"
LIST id_speed
X 10
Y 15
W 60
H 100
TEXT
"Off"
"Slow"
"Med"
"Fast"
WINDOW
X 10
Y 120
W 140
H 20
LINKS id_difficulty id_speed
TEXT "This is Easy and Off"
TEXT "This is Easy and Slow"
TEXT "This is Easy and Med"
TEXT "This is Easy and Fast"
TEXT "This is Hard and Off"
TEXT "This is Hard and Slow"
TEXT "This is Hard and Med"
TEXT "This is Hard and Fast"
Using
parent objects that are also children
The
above example assumes that any combination of the parent objects will create a
unique index number for the child object to lookup. It works because the maximum value of each of the two parent
objects is a fixed number. This can
break down, however, if one of the parent objects is itself a child object, and
can thus change contents to different TEXT blocks with different number of
lines.
If
the contents of a parent can change, the math will not come up predictably if
it is not the first item linked, because its maximum value will be variable,
and more than one combination of selections can end up with the same index.
This commonly occurs when trying to chain two category selectors together when
the second “sub” category can have a different number of values depending on
the selection of the first category. If
a WINDOW object tries to link to both category selectors, it can’t index to the
correct entry because the maximum value of the subcategory can change.
LINKS
category sub
index = (value_of_category * max_of_sub) + value_of_sub
To
keep this from happening, we add a MAXVAL tag to the subcategory parent
object. The MAXVAL tag tells TealInfo
to use a fixed (non-changing) value when calculating the index of any children
linking to that parent.
Place
the MAXVAL tag in the definition of objects that are both a parent and a child.
Set MAXVAL equal to the largest maximum value it will ever have with any TEXT
object it contains. Then in the child
object that links to it, add extra blank TEXT objects as if that parent object
really did have that many choices.
Complex
Example:
# List of continents (category)
LIST continents
TEXT
"Europe"
"Asia"
"North America"
# List of countries (sub category, links
to continents)
# Add MAXVAL here because our maximum
value can change
LIST countries
LINKS continents
MAXVAL 3
TEXT
"England"
"France"
"Germany"
TEXT
"India"
TEXT
"United States"
"Mexico"
# List of countries (links to both
continent and country)
WINDOW locations
LINKS continents countries
TEXT "London,
Devonshire"
TEXT "Paris"
TEXT "Hamburg, Colon,
Frankfurt"
TEXT "New Delhi"
TEXT ""
TEXT ""
TEXT "Houston, Seattle,
Ukiah"
TEXT "Mexico City,
Mazatlan"
TEXT ""
For
more info on how to do multiple dependencies, download our TEALINFO DEV KIT for
examples.
Using Text Resources
Text
Resources allow a folio to minimize duplicated text by allowing multiple
objects to point to a common text block.
They also allow you to place more text in an object. Due to PalmOS limitations, an object cannot
contain more than 64k of text or data, including all TEXT objects it
needs. By using text resources, objects
can contain point to multiple text resources, each of which can contain up to
about 64k of text.
Defining
a text resource
Using
a TRES tag, define an object with a single TEXT field. Be sure to give the TRES
object a unique ID.
Referencing
a text resource
To
use a text resource, replace an object’s text with the text resource ID
preceded by an '@' (at sign). Do not
enclose it in quotes
Example
TRES id_notfound
TEXT "Sorry, no information is available about this device."
WINDOW
X 5
Y 14
W 80
H 100
LINKS id_device id_class
TEXT "4-5 Miles"
TEXT "3 Miles"
TEXT @id_notfound
TEXT @id_notfound
TEXT "15 Miles (estimated)"
NOTE: a TRES object add about 50 bytes of overhead, so space
savings will only occur with text of sufficient length, but text resource still
allow easy editing of commonly-used text.
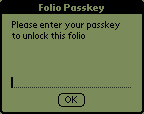
Creating Password-Protected Folios
When
creating a commercial folio, you may wish to use some of TealInfo's security
features to keep your folio from being illicitly copied, decompiled, or used.
As a first step, you can use the PASSWORD tag to lock the folio to a keyword.
You can set up the keyword to be required to open the folio, or only if someone
tries to decompile it. With the former
option, using a numerical keyword or one that is not easily remembered, can
keep the folio from being casually copied by someone unless they keep the
keyword with them.
As
a second level of protection, you create a custom version of the folio for
every customer, using a key they wouldn't want to give out, like their credit
card number.
Finally,
if you collect the customer's HotSync user name, you can create a folio keyed
to only work with their PalmPilot using the PASSWORD tag with the LOCKOUT style
option but an empty ("") TEXT field. See the TealInfo Object
Reference in the Appendix for more information.
Using TealInfo for Forms Applications
With
a little work, TealInfo can be used for simple forms applications using
POPEDIT, EDITWINDOW, POPLIST, CHECKLIST, and CHECKMARK objects. For the latter three objects, the REGISTER
style flag is typically used to keep any choices permanent. To
make EDITWINDOW changes permanent, the EDITWINDOW text must be stored in a
separate TRES block,
To
load the data back to the desktop, the folio “backup” option should be set in
the details dialog for the folio. The
folio will then be copied back to the user’s Palm backup folder on
HotSync. At that point, the folio
decompiler “UntlInfo” (in the TealInfo Dev Kit) can be used to convert the
folio back to text format suitable for parsing by a database script or
converter program.
Future
versions of TealInfo may include tools to help make such forms functionality
available to general users and other non-programmers.
Using MATH Objects
One of the most powerful features
of TealInfo is ability to create and use MATH objects. MATH objects display the results of a
mathematical expression, which can combine data from other objects and their
selections. MATH objects can be
displayed or themselves be used as values for other MATH objects or LINK
fields.
Expressions
Mathematical
expressions can be specified in simple, intuitive form. They are currently evaluated strictly from
left to right. Thus, the expression:
1+2*3
will
evaluate to 9, instead of 7, which follows the accepted convention of
performing multiply operations before additions and subtractions. To avoid confusion, parentheses should be
used to specify left-to-right order when mathematical precedence would normally
dictate otherwise.
(1+2)*3
The
parentheses will be ignored, but this will maintain compatibility with future
versions of TealInfo that may add support for both parentheses and precedence.
RPN
Notation
Complex
equations can also be specified using RPN (Reverse Polish Notation) popularized
by HP calculators. The benefit of RPN
is that it can evaluate any equation from left to right order without
parentheses. While this document cannot
go into a full explanation or tutorial of using RPN, the concept is simple:
RPN operates
on the concept of a list of numbers, commonly called a “stack”. When a number appears in an RPN expression
it is simply added to the stack. When
an operator (such as + or -) appears, it simply pulls the last two items off
the stack, performs math on them, and places the result back onto the
stack.
In
evaluating a “normal” math expression (like 1+1), we normally start with a
number, store it in our minds, then add an operator, remember it too, and then
wait until we get another number to evaluate the expression. With complex expressions, we end up saving a
whole bunch of numbers and operators and the order to evaluate them along the
way to getting an answer.
RPN is
much more efficient because you only store numbers. Operations occur immediately when you get the operator, so it’s
much more efficient. The operators
appear in the order you would normally evaluate them, not the order they appear
in the expression.
Some “standard” expressions translate to RPN as
follows:
1+2 becomes 1 2 +
(1+2) -3 becomes 1 2 + 3 -
1+(2-3) becomes 1 2 3 - +
(1+2)-(3+4) becomes 1
2 + 3 4 + -
Operands
The numbers that appear in an expression, the “operands”, can
simply be constant numerical values such as 1, 2, 3.1415, or .000007.
Operands can also be the name of another object, preceded with an
‘@’ sign or an ‘#’ sign. If the object
is a LIST or other selectable object, the ‘#’ sign will return the current
“value” (selected line number) of the object, substituted in for its name. The ‘@’ sign will instead return the value
of the object’s text. If the object is
a WINDOW, EDITWINDOW, other non-selectable object, or even another MATH object,
then the object’s current TEXT is evaluated as an expression itself and the
result inserted into the current MATH object’s expression. For LIST objects, the value of the current
selection is used. For instance, a
simple tip calculator could include:
TEXT “( @tip_rate * 0.01 + 1.0 ) * @sub_total”
Operators
MATH
objects support a number of mathematical operators, including:
Floating
Point Math
Addition (+)
Subtraction (-)
Multiplication (*)
Division (/)
Integer Math (fractional
parts of operators are ignored)
Modulus (%) – A%B is the leftover
part after repeatedly subtracting B from A
Comparison (return 1 if
true, 0 if false)
Greater-Than (>)
Less-Than (<)
Greater-or-Equal (>=)
Less-or-Equal (<=)
Equal (==)
Not-Equal (!=)
Logical (returns 1 if true,
0 if false)
Logical And (&&)
Logical Or (||)
Logical Xor (^^)
Bit Math
Bitwise And (&)
Bitwise Or (|)
Bitwise Xor (^)
Special
Truncate Digits (\) – truncates a
number to a specified decimal place
Round Digits (:) – similar to
truncate, but rounds up or down to the nearest result
Duplicate on Stack ($) – for RPN
math only, duplicates the last entry on the stack
RPN
Example
With a little ingenuity, MATH
operators can be used to create some very neat folios. For instance, suppose you want to have a tip
calculator which forces a 20% tip if the party is 6 or more people. The following RPN expression could take
advantage of comparison operators to calculate a grand total in a tip
calculator.
TEXT “@tiprate @numpeople 6 < * 20 @numpeople
6 >= * + .01 * 1.0 + @subtotal *”
@tiprate @numpeople 6 < *
The first operand of this expression just places the tipping rate
on the stack. Then it compares the
number of people into the party.
Remember that comparison operators evaluate to 1 if true, 0 if
false. Since this result is then
multiplied with the tipping rate on the stack, it has the effect of zeroing out
the total if 6 or more people are present.
20 @numpeople 6 >= * +
The next section, starting with “20”, does the exact
opposite. It evaluates to 0 if less
than 6 people are present, or 20 otherwise.
The two resulting products are added together, so the result is a rate
of “tiprate” if fewer than 6 people are present or 20 otherwise. This is then multiplied by .01 to get a
percentage, and added to 1 and multiplied with the subtotal to get the grand
total.
Indexing
When
using the ‘@’ symbol to reference text values in LIST and TABLE objects, the
current selection is normally used to index to the corresponding line or cell
of the LIST or TABLE. Using brackets (
[ ] ), a specific entry can be manually specified instead. This allows LIST and TABLE objects to be
used as convenient storage objects for lists of numbers used in
calculations. The brackets should
immediately follow the object name, with the index value enclosed by the
brackets. For example,
@choice[1]
@choice[2]
@choice[3]
reference the first three items in a LIST named “choice”. Interestingly,
@choice[#choice]
is equivalent to
@choice
Parameters
Sometimes, it is useful to re-use a mathematical expression
defined in a referenced MATH object, but with one or two of the numbers changed
from use to use. In these instances,
curly braces ( { } ) can be used to pass extra values into the MATH object to
be used in evaluating the expression.
In the referencing MATH object, curly braces are added after the
referenced object name, containing one or more values separated by columns. The values are then read from within the
referenced MATH object using the special symbols $1, $2… etc.
For instance if a math object called “calc_tax” contains the
following formula (rate/100+1)*subtotal:
TEXT “$2 100 / 1 + $1 *”
It can be used to calculate the totals for
different subtotal/tax combinations:
TEXT “@calc_tax{21.95,6.5}”
Notes:
Parameters can only be used in undisplayed referenced objects. As these objects expect and use parameters,
they must be hidden using a blank PAGES tag, as their value without parameters
is undefined. Also, when used in
combination with indexing, parameters and their associated curly braces
must come after the indexing square brackets, not before.
Special
Notes
Math objects
can also be used as sources for LINKs to other objects. When referenced as a LINK, only the integer
portion (the part left of the decimal point) of the number is used. When referenced from an expression in another
Math object, however, the full value is used.
Using DRAW Objects
DRAW and POPDRAW objects let you draw graphics onto a
rectangular area of the screen with a series of simple graphic commands. Graphics generated this way can be much more
space efficient that bitmap graphics, and can also vary according to user
selections when combined with MATH objects.
DRAW object commands appear in a
TEXT block with one command per line.
Lines beginning with a ‘#’ sign are ignored.
The following simple example draws
a holiday greeting on the screen.
DRAW
X 10
Y
20
W 140
H 110
TEXT
"FCOLOR 212"
"DLINE 40
90 70 20"
"DLINE 70 20
100 90"
"GLINE 100 90
40 90"
"FCOLOR 161"
"DRECT 60
60 7 7 3"
"DRECT 70
30 4 4 3"
"GRECT 50 80
7 7 3"
"GRECT 80
70 6 6 3"
"FCOLOR 255"
"DRECT 65
90 10 4 0"
"DFRAME 10 10 120 90 5 3"
"DCHARS 1 30 40 Season's Greetings"
See the appendix for a full list of valid commands.
Commands can also accept
references to external objects in place of numerical or text parameters. Use the ‘#’ sign followed by the object name
to insert an object’s current selection number into a drawing command, or ‘@’
followed by the name to insert it’s current text.
Appendix A – MkTlInfo Object Reference
This
appendix lists the screen objects and properties recognized by MkTlInfo in
making custom TealInfo folios. More
comprehensive references and examples can be found in the TealInfo Developer’s
Kit, found on the developer’s section of the TealPoint web site.
Basic Display Objects
WINDOW
Description:
A basic
screen object, WINDOW objects define a rectangular region of the screen that
contains text. The text automatically
wraps lines of text if necessary, and supports vertical or horizontal scrolling
and optional columns and grid lines.
Text in WINDOW objects can be viewed, but not be edited or selected.
Required
Fields:
X Y W H
TEXT
Optional
Fields:
PAGES
STYLE FONT TABS LINKS CYCLE DELAY COMPRESS
Supported
Styles:
VERT_RULE
HORIZ_RULE INVERTED NO_BORDER BOLD_BORDER ALIGN_RIGHT ALIGN_CENTER
ALIGN_LEFT_START ALIGN_RIGHT_START ALIGN_CENTER_START ALIGN_LEFT_END ALIGN_RIGHT_END ALIGN_CENTER_END NO_SCROLL
MASK_BUTTON_SCROLL
Notes:
A WINDOW
holds a block of text that automatically word-wraps if longer than one line.
Normally, to take advantage of this feature, paragraphs should be defined as
one continuous line. As MkTlInfo only supports a 4000 character long line, this
is typically done by appending individual lines with a continuation mark (\) at
the end of lines. See the TealInfo field reference below for more information.
Columns
and line rulings are supported, allowing the display of the text in tabular or
columnar layout. To do so, use the TABS
field to define the width of individual columns, and enter multiple
quote-delimited chunks of data on each line, or separate the text for each
column on a line using tab characters imbedded in the text. The VERT_GRID and HORIZ_GRID fields can be
used to add grid lines to the columns.
When VERT_GRID is defined, columns are treated as spreadsheet-like
cells, and data is truncated if necessary to fit within each column. When omitted, columns are treated like
tab-stops in a word processor. Text
may overflow into neighboring columns; tab characters simply advance to the
next column.
By
default, column entries are left justified. The ALIGN_CENTER
and ALIGN_RIGHT styles can override this justification in all
columns. In turn, the ALIGN_RIGHT_START and ALIGN_RIGHT_END, ALIGN_CENTER_START and ALIGN_CENTER_END styles can be used to set alternate
justification for only the first or last columns.
Since
text in a window is not selectable, WINDOW objects have no “current value” and
thus cannot be used as the target of a LINK field in another object. They can themselves LINK to other objects,
however, and this is a common use of WINDOW objects. For instance, by defining multiple TEXT fields and using the LINK
field to target, say, a LIST object, the window can be used to display
different data depending on the current selection of the LIST object.
POPWINDOW
Description:
A
scrollable, auto-wrapping text window that comes up when a trigger button is
pressed.
Required
Fields:
X Y W H
BX BY BW BH BTEXT TEXT
Optional
Fields:
PAGES
STYLE FONT TABS LINKS BFONT COMPRESS
Supported
Styles:
VERT_RULE
HORIZ_RULE INVERTED BOLD_BORDER ALIGN_RIGHT ALIGN_CENTER ALIGN_LEFT_START
ALIGN_RIGHT_START ALIGN_CENTER_START
ALIGN_LEFT_END ALIGN_RIGHT_END ALIGN_CENTER_END NO_SCROLL MASK_BUTTON_SCROLL FILLED SQUARE_BUTTON
Notes:
A variation on WINDOW objects, most of a POPWINDOW object is
normally hidden. Only a small trigger
button defined by BX, BY, BW, and BH is shown on screen. The button resembles a standard PalmOS text
button. A BTEXT field defines its
label. When tapped, the window appears,
and stays on screen until tapped to dismiss it.
LABEL
Description:
A simple
text label.
Required
Fields:
X Y TEXT
Optional
Fields:
PAGES
STYLE FONT COMPRESS
Supported
Styles:
INVERTED
ALIGN_CENTER ALIGN_RIGHT
Notes:
LABEL objects are drawn so that
the upper-left, upper-right, or upper-center of the text is aligned at the
designated coordinate. Text is not
wrapped and cannot scroll.
RECT
Description:
A bare
graphic rectangle, either filled or not, used as a graphic embellishment
Required
Fields:
X Y W H
Optional
Fields:
PAGES
STYLE
Supported
Styles:
FILLED ROUND_BORDER BOLD_BORDER
IMAGE
Description:
Displays
a graphic in TealPaint image format or subrectangle of an image in the
specified rectangle
Required
Fields:
X Y W H
SX SY DATABASE RECORD
Optional
Fields:
PAGES
STYLE LINKS CYCLE DELAY
Supported
Styles:
NO_BORDER
BOLD_BORDER BUTTON_SCROLL
Notes:
The
bounding box for the image must be a multiple of 8 pixels wide. SX and SY
define the offsets into the source image from which to grab the subrectangle.
SX must also be a multiple of 8 pixels wide, and the source image must not be
wider than 160 pixels.
DATABASE
defines the name of the image database. It is case sensitive and must match the
name of the Image Database as it appears in TealInfo or TealPaint. The image
can also be tacked onto the end of the TealInfo folio using MkTlInfo. If the image is appended in this way, then
DATABASE should hold the name of the folio instead. Note that the image will fail to draw if the folio is renamed.
RECORD
defines the image number of the database to use. The first image in a database
is image 0.
To create
simple page flipping animation, set the CYCLE parameter equal to the number of
frames of animation. TealInfo will step forward through the image databases,
looping from image RECORD to image RECORD+CYCLE-1, stopping between from frames
by an amount specified by DELAY, in tenths of a second.
POPIMAGE
Description:
A
popup-window displaying a TealPaint image or subrectangle of an image.
Required
Fields:
BX BY BW
BY BTEXT X Y W H SX SY DATABASE RECORD
Optional
Fields:
PAGES
STYLE LINKS CYCLE DELAY BFONT
Supported
Styles:
VERT_RULE
HORIZ_RULE INVERTED NO_BORDER BOLD_BORDER ALIGN_RIGHT ALIGN_CENTER FILLED
ALIGN_LEFT_START ALIGN_RIGHT_START ALIGN_CENTER_START ALIGN_LEFT_END
ALIGN_RIGHT_END ALIGN_CENTER_END NO_SCROLL MASK_BUTTON_SCROLL BUTTON_SELECT
STROKE_FIND REGISTERL
Notes:
This
object has the same image and usage restrictions as an IMAGE object. As a small
bonus feature, however, color or grayscale images shown in a full-screen
POPIMAGE objects will appear in 16 grey levels on a Palm V-style display (Palm
V, Visor), even under OS 3.1, which does not otherwise support the 16-shade
mode.
Interactive Selection Controls
LIST
Description:
A
scrollable vertical list of selectable text items, supporting optional columns
and vertical and horizontal ruled lines.
Required
Fields:
X Y W H
TEXT
Optional
Fields:
PAGES
STYLE FONT TABS LINKS DEFAULT MAXVAL COMPRESS
Supported
Styles:
VERT_RULE
HORIZ_RULE INVERTED NO_BORDER BOLD_BORDER ALIGN_RIGHT ALIGN_CENTER
ALIGN_LEFT_START ALIGN_RIGHT_START ALIGN_CENTER_START ALIGN_LEFT_END
ALIGN_RIGHT_END ALIGN_CENTER_END NO_SCROLL
MASK_BUTTON_SCROLL BUTTON_SELECT STROKE_FIND REGISTER
Notes:
LIST objects are interactive elements. While they are defined and used like WINDOW objects, text does not automatically word-wrap, and any
line in the LIST can be highlighted by the user by tapping on it.
This gives the LIST a current numerical “value” ranging from zero
(the first item) to the number of items in the list (minus one). This value can be used as an operand for
expressions in MATH objects, or change the contents of other objects that have
LINK fields referring to us.
The entries in a LIST are specified using multiple-lines of text
in a TEXT field. Each line specifies a
separate entry in the list. If the LINK
field is used to link the object to another object’s value, multiple TEXT
fields can be used to define changing contents for the LIST.
POPLIST
Description:
A
scrollable, selectable item list triggered by popup button, resembling the
PalmOS category selector
Required
Fields:
X Y W H
TEXT BX BY BW BH
Optional
Fields:
PAGES
STYLE FONT TABS LINKS DEFAULT MAXVAL BFONT COMPRESS
Supported
Styles:
VERT_RULE
HORIZ_RULE INVERTED BOLD_BORDER ALIGN_RIGHT ALIGN_CENTER ALIGN_LEFT_START ALIGN_RIGHT_START
ALIGN_CENTER_START ALIGN_LEFT_END ALIGN_RIGHT_END ALIGN_CENTER_END NO_SCROLL
MASK_BUTTON_SCROLL BUTTON_SELECT STROKE_FIND FILLED REGISTER SQUARE_BUTTON
Notes:
The
trigger button for POPLIST objects resemble standard PalmOS category
selectors. They show the text of the
current selection with a triangular trigger symbol. They should be sized wide enough to fit the widest text line to
be drawn without truncating the text.
TABLE (New in 4.0)
Description:
Nearly
identical to LIST objects, TABLE objects bring up a scrollable, selectable list
of text items. Columns defined by the
TABS field, however, are required.
Unlike a LIST, which selects an entire row of items at a time, TABLE
objects allow the selection of single cells within the object. A TABLE object with a single column is
equivalent to a LIST object.
Required
Fields:
X Y W H
TEXT TABS
Optional
Fields:
PAGES
STYLE FONT LINKS DEFAULT MAXVAL COMPRESS
Supported
Styles:
VERT_RULE
HORIZ_RULE INVERTED NO_BORDER BOLD_BORDER ALIGN_RIGHT ALIGN_CENTER
ALIGN_LEFT_START ALIGN_RIGHT_START ALIGN_CENTER_START ALIGN_LEFT_END
ALIGN_RIGHT_END ALIGN_CENTER_END NO_SCROLL MASK_BUTTON_SCROLL BUTTON_SELECT
STROKE_FIND REGISTER
Notes:
The current “value” of a TABLE object corresponds to the current
highlighted cell. Cells are numbered
starting at zero from left to right and then top to bottom.
POPTABLE (New in 4.0)
Description:
A pop-up
version of the TABLE object, POPTABLE objects bring up a Table when their
trigger buttons are tapped. The trigger
buttons show the contents of the current cell.
Required
Fields:
X Y W H
TEXT BX BY BW BH TABS
Optional
Fields:
PAGES
STYLE FONT LINKS DEFAULT MAXVAL BFONT COMPRESS
Supported
Styles:
VERT_RULE
HORIZ_RULE INVERTED BOLD_BORDER ALIGN_RIGHT ALIGN_CENTER
ALIGN_LEFT_START ALIGN_RIGHT_START ALIGN_CENTER_START
ALIGN_LEFT_END ALIGN_RIGHT_END ALIGN_CENTER_END NO_SCROLL MASK_BUTTON_SCROLL
BUTTON_SELECT STROKE_FIND FILLED REGISTER SQUARE_BUTTON
Notes:
The trigger button shows the name of the currently selected item,
and BX BY BW and BH define its bounds.
X, Y, W, and H define the bounds of the table the trigger brings up. The
button bounds must be large enough to contain the longest cell in order for it
to draw correctly.
OUTLINE
Description:
A
scrollable, selectable, hierarchical item list, this object shows a list of
data in outline tree form, where subsections of the tree may be collapsed and
hidden from view when desired.
Required
Fields:
X Y W H
TEXT
Optional
Fields:
PAGES
STYLE FONT TABS LINKS DEFAULT MAXVAL COMPRESS
Supported
Styles:
HORIZ_RULE
INVERTED NO_BORDER BOLD_BORDER NO_SCROLL MASK_BUTTON_SCROLL BUTTON_SELECT
STROKE_FIND REGISTER
Notes:
Similar
to standard LIST objects, OUTLINE objects show a list of selectable text
items. Unlike a LIST, however, the
items are displayed like an outline tree with items, sub-items, and
sub-sub-items. Subsections can be hidden or shown by tapping on control
triangles next to items in the outline.
To define
an outline list's contents, create a multi-line TEXT field, preceeding lines
with one or more '>' or '<' characters to define it's level in the tree.
Root items are bare. Subitems to root entries are preceeded by one '>',
sub-items to sub-items are preceeded by '>>', etc. If the item in the
list should appear initially when the folio is first opened, then use a '<'
character instead of a '>'. The '<' character forces the control on the
previous line to default to the open state.
To set up
an OUTLINE object for horizontal scrolling, use a TABS field with a single
value specifying the virtual width of the scrolling area in pixels. OUTLINE objects not not otherwise support
columns.
The
following example sets up an OUTLINE object with three levels of items:
OUTLINE
X 10
Y 20
W 100
H 120
TEXT "Restaurants"
"Hotels"
"Taxis"
"Museums"
">Art"
">Nature"
">>Marine"
">>Land"
"Nightclubs"
">Nice"
">Seedy"
POPOUTLINE (New in 4.0)
Description:
A
POPOUTLINE object is pop-up version of an expanding OUTLINE object. When popped up, outline branches can be
opened up or collapsed by tapping on standard outline control triangles. When tapping elsewhere on a line the list is
selected and the popup window is closed.
Required
Fields:
X Y W H
BX BY BW BH TEXT
Optional
Fields:
PAGES
STYLE FONT TABS LINKS DEFAULT MAXVAL BFONT BTEXT COMPRESS
Supported
Styles:
HORIZ_RULE
INVERTED BOLD_BORDER NO_SCROLL MASK_BUTTON_SCROLL BUTTON_SELECT STROKE_FIND
REGISTER FILLED SQUARE_BUTTON
Notes:
See
Outline objects for instructions on defining levels in a POPOUTLINE object.
CHECKMARK
Description:
A
checkmark control resembling standard PalmOS checkbox controls.
Required
Fields:
X Y W H
TEXT
Optional
Fields:
PAGES
STYLE FONT LINKS TARGET DEFAULT COMPRESS
Supported
Styles:
INVERTED
REGISTER
Notes:
A simple
one-item checkbox, CHECKMARK controls have a current “value” corresponding to
their state. When used as a LINK target
or MATH operand from another object, checkmark objects assume a value of 0 when
unchecked and 1 when checked.
CHECKLIST
Description:
A
scrollable, selectable list of text items, each line of which can have an
optional checkbox.
Required
Fields:
X Y W H
TEXT
Optional
Fields:
PAGES
STYLE FONT TABS LINKS DEFAULT MAXVAL COMPRESS
Supported
Styles:
VERT_RULE
HORIZ_RULE INVERTED NO_BORDER BOLD_BORDER ALIGN_RIGHT ALIGN_CENTER FILLED
ALIGN_LEFT_START ALIGN_RIGHT_START ALIGN_CENTER_START ALIGN_LEFT_END
ALIGN_RIGHT_END ALIGN_CENTER_END NO_SCROLL MASK_BUTTON_SCROLL BUTTON_SELECT
STROKE_FIND REGISTER
Notes:
CHECKLIST objects are similar to
LIST objects, but can optionally show checkboxes next to specified lines. The checkboxes can be checked on and off,
and will be saved in the folio if the REGISTER field is defined. The current “value” of the CHECKLIST object,
like standard LIST objects, is defined as the selected line, not by the state
of the checkboxes.
List entries are defined by a
multi-line TEXT fields, where each line of the text field defines an item in
the scrolling list. Each line should start with either a plus (+) character for
items that start up pre-checked or minus (-) character for those which start
out unchecked. Lines with neither show
up simply as labels.
Normally, the checklist will
revert back to its initial state when the object is changed or the folio is
exited. If the REGISTER style flag is used, the folio is not in flash memory,
*and* the text for the checklist is stored in a TRES text resource, checked
entries are permanently saved even if you leave TealInfo and return.
Data Entry Controls
EDITWINDOW
Description:
An
editable text window. Often used to make folios for entry form or data
acquisition.
Required
Fields:
X Y W H
TEXT
Optional
Fields:
PAGES
STYLE FONT TABS LINKS COMPRESS
Supported
Styles:
VERT_RULE
HORIZ_RULE INVERTED NO_BORDER BOLD_BORDER ALIGN_RIGHT ALIGN_CENTER
ALIGN_LEFT_START ALIGN_RIGHT_START ALIGN_CENTER_START ALIGN_LEFT_END
ALIGN_RIGHT_END ALIGN_CENTER_END NO_SCROLL BUTTON_SCROLL
Notes:
An
editable WINDOW object, EDITWINDOW objects are text areas that can be used
either to save notes on their own or to modify text resources shared with other
objects. They display as WINDOW
objects, but brings up an editing area when the window itself is tapped. The
editing area's overlays the defined window area, giving a clean, seamless
editing mode. Due to their ability to
be edited, EDITWINDOW objects have limited formatting when editing.
Commonly,
EDITWINDOW objects are used as single-line text fields, but multiple-lines are
also supported. When used in multi-line mode, the editing and display modes do
not line up as well as in single-line mode.
Otherwise,
EDITWINDOW objects follow the same limitations as POPEDIT objects, including
the requirement that EDITWINDOWS linked to other objects must place all of its
text in TRES text resources to maintain proper formatting of all objects after
editing.
POPEDIT
Description:
An
editable popup text window.
Required
Fields:
BX BY BW
BH BTEXT TEXT
Optional
Fields:
PAGES
STYLE FONT LINKS BFONT X Y W H COMPRESS
Supported
Styles:
FILLED
HORIZ_RULE SQUARE_BUTTON
Notes:
An
editable text area, POPEDIT objects can be used either to save notes on their
own or to modify text resources shared with other objects. The text editing
window is brought up with a tap on the trigger button specified by BX,BY,BW,
and BH. The POPEDIT object can be used to modify any TRES resource used by any
other object, but unpredictable results may result if used to modify text used
by other than WINDOW or POPWINDOW objects, as the POPEDIT control may show
special control codes normally hidden from view.
SPECIAL
NOTE: When the contents of a POPEDIT window can change because the POPEDIT
object is linked to other objects, the contents of the POPEDIT window must reside in separate TRES text
resource objects, or the text pre-wrapping system will get confused and
mis-wrap the text after you edit one of the TEXT blocks near the top of the
list of possible entries.
INPUT (New in 4.0)
Description:
An INPUT
object creates a button that can modify or replace the contents of an
EDITWINDOW object. Typically, they are
used to create text-entry keys for forms or calculator folios.
Required
Fields:
BX BY BW
BH BTEXT TARGET
Optional
Fields:
PAGES
STYLE BFONT LINKS
Supported
Styles:
FILLED
SQUARE_BUTTON
Notes:
The
behavior of the INPUT object is determined by the contents of the TARGET field,
which takes on the following form:
TARGET “@<editname><mode><action><text>”
where:
<editname> is
the name of the EDITWINDOW object to affect
<mode> is either a
colon “:” (immediate mode) or semicolon “;” (delayed mode).
<action> is either a plus
“+” (add), equals “=” (replace), minus “-“ (subtract), or
number sign “#” (calculator key action).
<text> is the new text
In “immediate”
mode, other screen objects which depend on the entry are immediately refreshed
to reflect the new text. In “delayed”
mode, the text is entered, but only the EDITWINDOW object itself is
redrawn. Other objects such as
on-screen math objects are not redrawn in delayed mode.
The “add”
action appends text to the end of the specified EDITWINDOWs current contents,
while the “replace” action replaces it entirely. The “subtract” action ignores any
passed text and simply deletes the last character from the EDITWINDOW. The last action, the “calculator”
action, acts either like “add” or “replace” action depending on
whether a calculation is pending. If
one has yet to be flushed out (due to entry using delayed-mode key
presses, it adds the specified text.
Once calculated, the next press replaces the contents.
Common applications include:
Calculator-style entry buttons (delayed
calculation)
TARGET
“@number;#1”
TARGET
“@number;#2”
TARGET
“@number;#3”
Backspace
TARGET “@number;-”
Enter/Calculate key (note the empty text to add)
TARGET “@number:+”
Clear key (sets contents to nothing)
TARGET “@number:=”
Filling a form field
TARGET “@gender:=female”
TARGET “@gender:=male”
New to 4.20: If TARGET text is used with no target object (TARGET “a”), then
the character(s) specified will be entered into the general input stream,
simulating a user entering the characters by hand. If another object has the STROKE_FIND style set, it will respond
to the character, allowing INPUT objects to change the current selection in an
external LIST object to an entry whose first letter matches the indicated
letter.
Data Processing Controls
POPMERGE (New in 4.0)
Description:
Similar
to POPWINDOW objects, POPMERGE objects bring up scrollable, auto-wrapping text
windows when a specified trigger button is pressed. The contents of the windows, however, can contain text from
various other windows, fields, and objects, both hidden and shown. These are “merged” into the text of the
final window to produce the combined output
Required
Fields:
BX BY BW
BH BTEXT TEXT
Optional
Fields:
PAGES X Y
W H STYLE FONT TABS LINKS BFONT COMPRESS
Supported
Styles:
VERT_RULE
HORIZ_RULE INVERTED BOLD_BORDER ALIGN_RIGHT ALIGN_CENTER ALIGN_LEFT_START
ALIGN_RIGHT_START ALIGN_CENTER_START ALIGN_LEFT_END ALIGN_RIGHT_END
ALIGN_CENTER_END NO_SCROLL MASK_BUTTON_SCROLL FILLED SQUARE_BUTTON
Notes:
The text
appearing in a POPMERGE popup is defined using a TEXT field in the expected
way. Placeholders for text pulled from
other objects are inserted using the ‘@’ symbol followed by the name of an
object to be included. Often, the
source objects are hidden objects controlled by user selections. Sample text might look like:
TEXT “Madame sees your @problem difficulty will get much
@prediction today!”
PRINTMERGE (New in 4.0)
Description:
A
PRINTMERGE object combines text from separate objects, but instead of
displaying it in a pop up window, the text is sent to TealPrint for print out
on a supported printer. This allows
folios to output form documents, summaries, or receipts based on user inputs
and selections.
Required
Fields:
BX BY BW
BH BTEXT TEXT
Optional
Fields:
PAGES
STYLE LINKS BFONT COMPRESS
Supported
Styles:
FILLED
SQUARE_BUTTON
Notes:
TealPrint
must also be installed on the handheld for PRINTMERGE objects to be
functional. When selected, a
PRINTMERGE object will bring up a standard TealPrint printer dialog to confirm
print options prior to sending the text to the printer or spooler.
MATH (New in 4.0)
Description:
A math
object is a simple window displaying the numerical result of a
calculation. Evaluated expressions can
contain references to the current (zero-based) selection of objects with a
current “value” such as lists, outlines, and tables. They can also evaluate numbers or expressions found in static
objects such as windows, other math objects, and other objects that cannot be
selected.
Required
Fields:
X Y W H
TEXT
Optional
Fields:
PAGES
STYLE FONT LINKS DECIMALS DIGITS COMPRESS
Supported
Styles:
INVERTED
NO_BORDER BOLD_BORDER ALIGN_RIGHT ALIGN_CENTER
Notes:
MATH
objects are one of the most complex and ambitious TealInfo objects. They show the result of a calculation as a
floating-point number. To use one, a
mathematical expression (equation) is specified with a TEXT field, but the
result of the evaluation of the expression is what gets displayed. The number displayed can be rounded off to a
number of decimal points to the right of the decimal point using the DECIMALS
field, or padded with zeroes on the left to a total number of digits using the
DIGITS field.
Mathematical
expressions can be specified in simple, intuitive form. They are currently evaluated strictly from
left to right, and in “standard” or RPN (Reverse Polish Notation) order. See the chapter “Using MATH Objects” for
more information and examples on using MATH objects.
Math objects can also be used as
sources for LINKs to other objects.
When referenced as a LINK, only the integer portion (the part left of
the decimal point) of the number is used.
When referenced from an expression in another Math object, however, the
full value is used.
Operands
The numbers that appear in an expression, the “operands”, can
simply be constant numerical values such as 1, 2, 3.1415, or .000007.
Operands can also reference another object, preceded with ‘@’ or
‘#’ signs. If the object is a LIST or
other selectable object, the ‘#’ (number sign) can be used to insert the
current “value” of the object, which is the number of the current selection
starting at zero. The ‘@’ sign is
similar, except that is inserts the numerical value of the current text, which
must be either numerical or a mathematical expression itself.
If the object is a WINDOW, EDITWINDOW, other non-selectable
object, or even another MATH object, then the object’s entire TEXT block is
evaluated as an expression and the result inserted into the current MATH
object’s expression. For a LIST object,
only the text of the current selection is used. For instance, a simple tip calculator could include:
TEXT “( @tiprate * 0.01 + 1.0 ) * @subtotal”
Operators
MATH
objects support a number of mathematical operators, including:
Floating
Point Math
Addition (+)
Subtraction (-)
Multiplication (*)
Division (/)
Integer Math (fractional
parts of operators are ignored)
Modulus (%) – A%B is the leftover
part after repeatedly subtracting B from A
Comparison (return 1 if
true, 0 if false)
Greater-Than (>)
Less-Than (<)
Greater-or-Equal (>=)
Less-or-Equal (<=)
Equal (==)
Not-Equal (!=)
Logical (returns 1 if true,
0 if false)
Logical And (&&)
Logical Or (||)
Logical Xor (^^)
Bit Math
Bitwise And (&)
Bitwise Or (|)
Bitwise Xor (^)
Special
Truncate Digits (\) – truncates a
number to a specified decimal place
Round Digits (:) – similar to
truncate, but rounds up or down to the nearest result
Duplicate on Stack ($) – for RPN
math only, duplicates the last entry on the stack
Graphics Controls
DRAW (New in 4.0)
Description:
DRAW
objects define a rectangular region whose contents are rendered according to simple
graphics drawing commands. DRAW objects
are typically used to draw graphs or charts in response to numerical input, or
add extra graphic elements.
Required
Fields:
X Y W H
TEXT
Optional
Fields:
PAGES
STYLE COMPRESS LINKS CYCLE DELAY
Supported
Styles:
INVERTED
BOLD_BORDER NO_BORDER
Notes:
Powerful
DRAW objects accept a series of graphics drawing commands that allow rendering
of simple custom graphics or text into a folio. They can reference values in external objects, allowing them to
be used to draw graphics that vary with user selections.
Commands
in DRAW objects are inserted in a single multi-line TEXT block of the object
definition. Each line begins with a
command, followed by one or more numerical or text values needed by the
command. The following commands are
supported:
DLINE x1 y1 x2 y2
GLINE x1 y1 x2 y2
ELINE x1 y1 x2 y2
Draws a single-pixel line from
coordinates (x1,y1) to (x2,y2), relative to the top-left corner of the
object. The (D) option draws the line
in the current foreground color (default black). The (E) option erases the line to the current background color
(default white). The (G) option “grays”
the line drawing it in a 50% dither pattern combining foreground and background
colors.
DRECT x y width height corner_radius
GRECT x y width height corner_radius
ERECT x y width height corner_radius
Draws, erases, or “grays” a filled
rectangle of the given dimensions. The
corner of the rectangle can be set sharp or rounded using a radius of 0-4
pixels.
DFRAME x y width height corner_radius
thickness
EFRAME x y width height corner_radius thickness
Draws or erases an unfilled
rectangular frame (box) of the given dimensions. The radius of the corners can be set from 0-4 pixels, while the
thickness of the frame can be set from 1-4 pixels.
DCHARS font x y text
ICHARS font x y text
ECHARS font x y text
Draws specified text to the
screen. The (D) options draws the text
black-on-white, while the (I) option draws it white-on-black. The (E) options simply erases the area where
text should be.
FCOLOR r g b
BCOLOR r g b
Sets the current foreground or
background colors. These options only
function on a color device, and are ignored on monochrome units. They allow you to change the current foreground
and background drawing colors, which default, respectively, to black and
white. The colors are specified as
three numerical values from 0 to 255, respectively setting the red, green, or
blue component of the colors.
Sample
colors:
White 255 255 255
Black 0 0 0
Red 255 0 0
Green 0 255 0
Blue 0 0 255
Orange 255 200 0
Yellow 255 255 0
Purple 200 0 255
Gray 150 150 150
To substitute values from other objects into the
command list use the ‘@’ or ‘#’ signs followed by the name of the object to
insert. The ‘@’ sign inserts the
current text from the object or the numerical equivalent of that text if a
number is needed. The ‘#’ sign returns
the current “value” of the object instead, which is the zero-based number of
the current selection in an outline, list, or table. The ‘#’ sign will reference the integer portion of a MATH object
as well.
Example: DLINE 10 10 @end_x @end_y
DRAW objects expect numerical values only, and
will not consistently evaluate expressions or external references with
parameters on their own. When math
operations are needed, DRAW objects should contain simple references to hidden
MATH objects to perform the needed calculations.
POPDRAW (New in 4.0)
Description:
Pop-up
version of a DRAW object.
Required
Fields:
BX BY BW
BH BTEXT X Y W H TEXT
Optional
Fields:
PAGES STYLE
COMPRESS BFONT LINIKS
Supported
Styles:
FILLED
BOLD_BORDER NO_BORDER INVERTED SQUARE_BUTTON
Special Controls
GOTO
Description:
A button
that closes the current folio and opens another one specified by name. Can also
open a specified Doc file in TealDoc, movie in TealMovie.
Required
Fields:
BX BY BW
BH BTEXT TARGET
Optional
Fields:
PAGES
STYLE BFONT TARGET LINKS
Supported
Styles:
FILLED
SQUARE_BUTTON
Notes:
Linking to External folios:
TARGET,
followed by the name of a folio in quotes specifies the folio to open when this
control is tapped. Note that the TARGET must exactly match the name of the
target folio as it appears in TealInfo,
including capitalization and spacing.
Back Buttons:
Set
TARGET to “$BACK” to create a button which will return back to a previous folio
which may have linked to you.
Close Buttons:
A GOTO
object with no TARGET field replaces the standard close button in the upper
right corner of the folio.
External Programs:
TARGET
can also specify the name of a TealDoc document or TealMovie movie, to
launch. Other programs may be launched
as well if they support a global find operation, and have the same CreatorID of
the document, but irregular behavior may occur if the other program is not
specifically expecting to be called externally in this manner. With TealDoc and TealMovie, TealInfo will be
re-launched after the movie or document is closed. Documents in VFS are also supported if they are in the same
folder as the current folio, though the launched application must be loaded
into RAM. This will almost certainly
not work inf VFS with non-TealPoint applications, however.
The
TARGET field functions like standard TEXT fields, in that you can specify more
than one TARGET field and use the LINK field to tie the launched document to an
external selection.
POPFIND (New in 4.20)
Description:
Searches
for an instance of a user-entered text string in a specified LIST or
WINDOW.
Required
Fields:
BX BY BW
BH BTEXT TARGET
Optional
Fields:
PAGES
STYLE BFONT LINKS
Supported
Styles:
INVERTED
SQUARE_BUTTON
Notes:
Specify
an object to search for in the TARGET field, preceded by an ‘@’ sign.
TARGET “@mydisplaylist”
When
tapped, a POPFIND button brings up a dialog asking the user for the text to
find. If the text is found in the LIST
or WINDOW object specified by the TARGET field, the list or window will be
scrolled to display the found text. If
a list, that entry will be selected.
POPFIND objects cannot find text across multiple objects or in text
which is not currently loaded into a displayed object.
SETPAGE (New in 4.0)
Description:
TealInfo
supports folios with up to 32 distinct pages.
Displayed objects can be shown on any one or more of these pages or not
at all. SetPage objects switch the
current page when pressed.
Required
Fields:
BX BY BW
BH BTEXT
Optional
Fields:
PAGES
STYLE BFONT TARGET LINKS
Supported
Styles:
FILLED
SQUARE_BUTTON
Notes:
While all objects in a folio are present in memory and can be
available for LINK operations and mathematical calculations, the SETPAGE
objects determines which objects are displayed and respond to screen taps. A quoted value from 1 to 32, specified in a
TARGET field, determines which page is activated when the button is tapped.
Individual objects determine which pages they appear on using the
PAGES field, followed by which pages they appear on. By default, objects appear on page 1 only. If PAGES is used with no numbers, the object
is hidden. SetPage objects can
optionally contain PAGES fields as well.
TRES
Description:
A text resource
Required
Fields:
TEXT
Optional
Fields:
(none)
Supported
Styles:
(none)
Notes :
TRES Text
resources act as placeholder objects for holding TEXT used by other
objects. They are handy to reduce file
size when, say, a paragraph of text is repeatedly used in one or more
objects.
TRES
objects can also used to break-up TealInfo OBJECTS from exceeding the Maximum
Object Text Size (See TEXT field for more info). There is about a 50-byte
overhead for using a TRES object, so you won't save much space on only a few
short lines of text.
TRES
objects take a single field, the TEXT field.
To reference a TRES object from another object, create a TEXT block
which only contains the name of the TRES object preceeded by an ‘@’ sign.
TEXT “@resname”
TRES
object can only replace an entire TEXT field.
They cannot be combined or used to replace only a portion of another
object’s TEXT field.
See the field descriptions in the next section for more details on how to use text resources.
RANDOM (New in 4.0)
Description:
A RANDOM
object provides a random value to be used in math expressions or LINKS to other
objects, and a button to update its value
Required
Fields:
BX BY BW
BH BTEXT MAXVAL
Optional
Fields:
PAGES
DEFAULT BFONT
Supported
Styles:
FILLED
SQUARE_BUTTON
Notes:
When set,
the DEFAULT field specifies the current “value” of the RANDOM object when the
folio is first opened. If missing, the
object will be assigned a random value from 0 to MAXVAL-1 on opening. By setting DEFAULT to MAXVAL, the Random
object can start up with a value with will not be repeated when the Randomize
button is tapped. This is useful to
say, display an instructional prompt such as “Tap the button below to get your
fortune”. The PAGES field can be used
with no parameters to hide the RANDOM object entirely if only the initial
randomization feature is needed.
YEAR (New in 4.0)
MONTH (New in 4.0)
DAY (New in 4.0)
HOUR (New in 4.0)
MINUTE (New in 4.0)
Description:
The Year,
Month, Day, Hour, and Minute objects do not have on-screen representations, and
do not accept any fields or styles.
Instead, they only contain a value, which can be used as LINKS to
objects or values within MATH objects using the ‘#’ reference operator. The values are automatically updated,
allowing for the creation of special calendars or clock folios.
Notes:
All
objects return values starting at 0.
Values of Year objects range from 0 for the year 2000, 1 for 2001, and
so on. Month objects return values from
0 (January) to 11 (December). Day
objects return the day of the month minus one, ranging from 0 (day 1) to 30 (day 31). Hour objects return values from 0 to 23,
minute objects from 0 to 59.
PASSWORD
Description:
The
presence of this object in a folio forces causes a passkey to be entered when
the folio is opened. This can be used to generate password-protected folios for
security or sales-demo purposes.
Required
Fields:
KEY TEXT
Optional
Fields:
STYLE
Supported
Styles:
LOCKOUT
REGISTER
Notes:
Used
for Registration
The
password to be entered is defined by the KEY field. When the LOCKOUT style is
defined, the folio cannot be entered until a correct key is entered. When no LOCKOUT field exists, the password
request can simply be dismissed. This
allows the development of “shareware” folios, using the password screen as a
registration reminder.
Saving
Passkey
When the
REGISTER style is defined, the password is saved once it's entered if the folio
is in RAM. If the REGISTER style is not set, the password is asked-for every
time. You can have multiple PASSWORD objects in a folio, but this is not
particularly useful.
Decompile
Protection
If you
provide empty TEXT ("") and do not set the LOCKOUT style
keyword, then the passkey will not be required to read the folio, but one will
need to enter it before the folio can be decompiled using the UnTlInfo program
in the TealInfo Dev Kit. In this use, the PASSWORD tag should appear at the top
of the list to prevent decompiling the tags above it.
User-Specific
Folios
If you
provide empty TEXT ("") and do
set the LOCKOUT style keyword, then the folio will only open on a Palm whose
HotSync user name matches the passkey. Use this to make secure folios that
cannot be used on other Palm if copied or beamed there.
GRAFFITI
Description:
Places
the graffiti shift indicator on screen.
It will appear on all pages of the folio.
Required
Fields:
X Y
Appendix B – MkTlInfo Field Reference
The
following list details the fields used to describe the objects in Appendix A.
Fields requiring a numerical value or expression such as 20+5 are followed by
"(value)". Fields requiring a text string in quotes are followed by
"(string)". Lastly fields requiring specialized text keywords (not in
quotes) are followed by "(Keyword)".
BFONT (value)
Defines
the font to be used for an object's activation button.
BTEXT (string)
Defines
text for a button or trigger.
BX (value)
Defines
the pixel offset of a trigger object or button from the left edge of the
screen.
BY (value)
Defines
the pixel offset of a trigger object or button from the top edge of the screen.
BW (value)
Defines
the width of a trigger object or button.
BH (value)
Defines
the height of a trigger object or button.
CYCLE (value)
This
field causes WINDOW objects to cycle through their list of TEXT fields. CYCLE
indicates the number of TEXT blocks to cycle through, starting with whatever
field would normally be shown. There must be at least that number of TEXT
fields present. For image objects, CYCLE indicates the number of images in the
database to cycle through, starting with the imaged defined by RECORD.
DELAY (value)
Indicated
the rate at which cycling (if turned on) occurs. This value is in tenths of
seconds between frames. Thus, a value of 10 will cause cycling a one change per
second.
DATABASE (string)
Defines
the name of a TealPaint image database to serve as a source for imagery.
DEFAULT (value)
Defines
the initial value for a list, outline, or checkmark object (starting at 0)
DECIMALS (value)
This field fixes the displayed number of digits to the right of
the decimal point for results of calculations from Math objects.
DIGITS (value)
This
field fixes the total displayed number of digits for results of calculations
from Math objects, padding with zeroes on the left if necessary to fill the
number of digits. DIGITS and DECIMALS
are mutually-exclusive.
FONT (value)
Defines
the font to be used for an object's body text. 0=standard font, 1=bold font,
2=large font, 3-5=standard system symbol fonts, 6=large number font. Use a
program like FontApp (available at
www.palmgear.com) to preview the correct fonts.
KEY (keyword)
Defines
the password that must be entered to unlock a folio with a PASSWORD object.
LINKS (value) (value)...
The LINKS
field can be used to link the contents of an object to current selection in one
or more other LIST, POPLIST, OUTLINE, or CHECKMARK objects, each of which is
identified by its name that follows the object TAG. An object using the LINKS
tag must follow all the objects listed in its list of links. More information appears in the next
appendix.
MAXVAL (value) ...
The MAXVAL field
specifies the largest number of items a variable list can contain. Use this
field to make the math work out when linking to objects whose contents can
change.
PAGES (value1) (value2)…
This
field determines which pages (1-32) that the current object appears. By default, all object appear on page 1
only. Specifying PAGES with no
following numbers hides an object on all pages.
RECORD (value)
Used for
IMAGE objects, this defines the number of the image (starting at 0) to be
shown.
STYLE (keyword) (keyword)...
Followed
by one or more style keywords like ALIGN_LEFT
and NO_BORDER, the STYLE field
determines alignment and other miscellaneous properties for screen objects.
SX (value)
For image
objects, defines the horizontal offset into the source image from which the
displayed image is grabbed. Must be a multiple of 8
SY (value)
For image
objects, defines the vertical offset into the source image from which the
displayed image is grabbed.
TABS (value)
The TABS
field sets tab stop positions within an object in pixels. Up to 63 tab
positions may be specified, creating 64 columns. Each tab value represents the
left edge of a column measured in pixels from the left edge of the object.
If you
create columns wider than the width of the object, the object will appear with
a horizontal scroll bar, which can be moved to view the full width of the
window, list, or outline object.
TARGET (string)
Defines
the folio to open when a GOTO button is pressed, or page number for a SETPAGE
object. Multiple alternate TARGET fields can be used if the GOTO object is
linked to other objects. In this use, the folio opened depends on the selection
of the object (typically a list) linked-to.
TEXT (string) (string)...
Defines
text for this object. Text items should be quoted, with text for separate
columns appearing on the same line as separate quoted groups of words. To
insert a quote in a string, use two quotes together ("") inside the
string.
Text for
multiline text objects (such as lists and outlines) should appear as more
quoted text on subsequent lines without the TEXT field name. Only TEXT fields
allow information for the field to follow on subsequent lines after the field
name itself.
A
backslash '\' character at the very end of a line indicates that the text on
the next line is a continuation of the current one. It should be used to break
up a line of text but have it treated as if it were entered as a very long line
of text, such as for a paragraph to be auto-wrapped by a WINDOW object.
MkTlInfo has a maximum input line length of 4000 characters.
There is
a maximum total text size of 32k for all TEXT blocks in a single screen OBJECT.
To overcome this limit, text can be externally-referenced to TRES objects, effectively
splitting up the text into one OBJECT per TEXT block.
EXAMPLE:
TEXT
"This is
a line of text."
"This is another line of text, followed by a blank line."
" "
"This is a paragraph of text, using the backslash " \
"character as a line-continuation marker so that " \
"TealInfo will know to re-wrap this block as if it " \
"were entered as a single line. Note the extra " \
"spaces at the end of each line."
X (value)
Defines
the object's pixel offset from the left edge (0) of the screen.
Y (value)
Defines
the object's pixel offset from the top edge (0) of the screen.
W (value)
Defines
the width of the object in pixels (screen is 160 pixels wide).
H (value)
Defines
the height of the object in pixels (screen is 160 pixels high).
Appendix C – MkTlInfo Style Reference
The following are
keywords supported by the STYLE field, where applicable.
Text Alignment
ALIGN_RIGHT
Align all
text to the right of its column.
ALIGN_CENTER
Center
all text in its column.
ALIGN_LEFT_START
Align the
first column to the left, ignoring the global setting.
ALIGN_RIGHT_START
Align the
first column to the right, ignoring the global setting.
ALIGN_CENTER_START
Align the
first column in the center, ignoring the global setting.
ALIGN_LEFT_END
Align the
first column to the left, ignoring the global setting.
ALIGN_RIGHT_END
Align the
first column to the right, ignoring the global setting.
ALIGN_CENTER_END
Align the
first column in the center, ignoring the global setting.
Appearance
INVERTED
Draw the
object with reversed colors (white text on black).
FILLED
RECT: Draw it filled-in
POPLIST: Draw its button filled-in
POPEDIT: Draw its button filled-in
POPIMAGE: Draw its button filled-in
GOTO: Draw its button filled-in
SQUARE_BUTTON
Draws an activation button with square corners, not default rounded ones
HORIZ_RULE
Draw
horizontal ruling lines between rows.
VERT_RULE
Draw
vertical ruling lines between columns. Note that vertical rules also have a
subtle effect on the behaviour of tab characters in text. Without vertical
rules, tabs function as they do in a word processor, advancing the cursor to
the next column to the right. If text extends past a tab stop, then next tab
brings the cursor to the next tab stop to the right. When vertical rules are
turned on, however, text between tabs is treated as data in a cell, truncated
if necessary to fit in the available space before the next tab stop, so data
never overflows into a neighboring column.
NO_BORDER
Don't
draw a border around the object.
BOLD_BORDER
Draw a
thicker border around the object.
ROUND_BORDER
Draw a
rounded border around the object.
User Interface
NO_SCROLL
Don't
allow a scroll bar to appear and don't reserve pixels for one when word
wrapping.
STROKE_FIND
Move the current selection to the next line whose first char matches an entered stroke.
BUTTON_SCROLL
Do
page-by-page scrolling of a text object when scroll buttons are pressed.
Default settings scrolls vertically with the Page Up/Down scrolling buttons.
Using variations on the BUTTON_SCROLL keyword, it's possible to map
combinations of the four applications buttons (Datebook, Address, To Do List,
and Memopad) to vertical and/or horizontal scrolling for objects.
When
mapped to a folio in this way, the default behavior of the application buttons
used is temporarily overridden only while the folio is open, and for POPIMAGE,
POPTEXT, and POPLIST objects, only when the popup is shown.
When
overriding such buttons, it's important to indicate the new button mapping in
the folio to avoid confusing the user.
Other
Supported Variations include:
BUTTON_SCROLL_A
Vertically
scroll with Page Up/Down buttons
BUTTON_SCROLL_B
Vertically
scroll with Date/Addr buttons
BUTTON_SCROLL_C
Vertically
scroll with Addr/ToDo buttons
BUTTON_SCROLL_D
Vertically
scroll with ToDo/Memo buttons
BUTTON_SCROLL_E
Horizontally
scroll with Page Up/Down buttons
BUTTON_SCROLL_F
Horizontally
scroll with Date/Addr buttons
BUTTON_SCROLL_G
Horizontally
scroll with Addr/ToDo buttons
BUTTON_SCROLL_H
Horizontally
scroll with ToDo/Memo buttons
BUTTON_SCROLL_I
Horizontally
scroll with Date/Memo buttons
BUTTON_SCROLL_J
Vertically
Page Up/Down, Horizontally Date/Addr
BUTTON_SCROLL_K
Vertically
Page Up/Down, Horizontally Addr/ToDo
BUTTON_SCROLL_L
Vertically
Page Up/Down, Horizontally ToDo/Memo
BUTTON_SCROLL_M
Vertically
Date/Addr, Horizontally ToDo/Memo
BUTTON_SCROLL_N
Vertically
ToDo/Memo, Horizontally Date/Addr
BUTTON_SCROLL_O
Vertically
Addr/ToDo, Horizontally Date/Memo
BUTTON_SELECT
Move the
current selection up or down when scroll buttons are pressed. Default settings
move the current select with the Page Up/Down scrolling buttons. Using
variations on the BUTTON_SELECT keyword, it's possible to map combinations of
the four applications buttons (Date, Address, To Do, and Memo) to scrolling
movement as well. When mapping a single button to a POPLIST object, the object
acts like the category selector in the standard application, cycling through
available choices. As with the BUTTON_SCROLL variations, when overriding the
application buttons, it's important to indicate the new button mapping in the
folio to avoid confusing the user.
Other
Supported Variations include:
BUTTON_SELECT_A
Change
selection up/down with the Page Up/Down buttons
BUTTON_SELECT_B
Change
selection up/down with the Date/Addr buttons
BUTTON_SELECT_C
Change
selection up/down with the ToDo/Memo buttons
BUTTON_SELECT_D
Change
selection down (looping) with the Date button
BUTTON_SELECT_E
Change
selection down (looping) with the Addr button
BUTTON_SELECT_F
Change
selection down (looping) with the ToDo button
BUTTON_SELECT_G
Change
selection down (looping) with the Memo button
Special Styles
COMPRESS
The
COMPRESS style forces an entire object to be stored compressed in the
folio. Compression typically results in
a 35-40% reduction in the size of the object.
As temporary storage and decompression time is needed to work with
compressed objects, compression should be used carefully to avoid performance
or memory problems. In general, do not
use compression for objects referenced by MATH expressions or that need to be
drawn often. It is generally safe to
compress popup objects, as they are used one at a time and are not accessed
when they are not popped up.
LOCKOUT
PASSWORD:
Require the key to be correct to enter the folio.
REGISTER
PASSWORD:
Save a registration key once entered.
Appendix D – Products
Visit us online at http://www.tealpoint.com
for our complete product line, including:
SHORTCIRCUIT ( http://www.tealpoint.com/softshrt.htm )
A new twist on gameplay fused from your all time action puzzle favorite
games, connect falling conduit pieces into explosive loops in this frantic race
against the clock.
SUDOKUADDICT ( http://www.tealpoint.com/softsudo.htm )
Sudoku Addict brings to your handheld the addictive worldwide puzzle
craze that has displaced crossword puzzles in many newspapers in Great Britain
and Japan.
TEALAGENT ( http://www.tealpoint.com/softagnt.htm )
Get news, movie times, stock quotes, driving directions, web pages and
more without need for a wireless connection.
TealAgent fetches and formats web-based content for offline viewing.
TEALALIAS ( http://www.tealpoint.com/softalia.htm )
Free up memory and make the most of external expansion cards. Placeholder 'Alias' shortcut files
automatically find, load, and launch apps and data from external SD cards,
increasing free main memory.
TEALAUTO ( http://www.tealpoint.com/softauto.htm )
Track and graph automobile mileage, service, and expenses with TealAuto,
the complete log book for your car or any vehicle. Extensive customization options and unmatched in features and
functionality.
TEALBACKUP ( http://www.tealpoint.com/softback.htm )
Backup your valuable data with TealBackup, supporting manual and
automatic backups to SD/MMC/CF cards and Memory Stick, backups through HotSync,
and optional compression and encryption.
TEALDESKTOP ( http://www.tealpoint.com/softdesk.htm )
Launch applications with TealDesktop, the themed replacement for the
standard system launcher screen with tabs, multiple card folders, drag and
drop, and more
TEALDOC ( http://www.tealpoint.com/softdoc.htm )
Read, edit, and browse documents, Doc files, eBooks and text files with
TealDoc, the enhanced doc reader.
Extensive display and customization options; TealDoc is unmatched in
features and usability.
TEALECHO ( http://www.tealpoint.com/softecho.htm )
Improve your Graffiti text input speed and accuracy, seeing what you
write with TealEcho digital "ink".
No more writing blind!
TEALGLANCE ( http://www.tealpoint.com/softglnc.htm )
See the time, date, upcoming appointments and todo items at power-up
with TealGlance. The TealGlance pop-up
utility and key guard comes up when you power up your handheld letting you see
your day "at a glance."
TEALINFO ( http://www.tealpoint.com/softinfo.htm )
Lookup postal rates, area codes, tip tables, schedules, airports, and
info from hundreds of free TealInfo databases. Create you own mini-apps; a handheld
reference library.
TEALLAUNCH ( http://www.tealpoint.com/softlnch.htm )
Launch applications instantly with the TealLaunch pop-up launcher and
button/stroke-mapping utility. Map
applications to button presses and pen swipes so you can get to your apps
quickly.
TEALLOCK ( http://www.tealpoint.com/softlock.htm )
Secure and protect your handheld with TealLock, the automatic locking
program with encryption and card support.
TealLock has unmatched features and customization options for personal
or corporate use.
TEALMAGNIFY ( http://www.tealpoint.com/softlens.htm )
Save your eyesight with TealMagnify, an ever-ready magnifying glass that
works with most any program.
TealMagnify lets you enlarge the screen for those times the text is too
small to read.
TEALMASTER ( http://www.tealpoint.com/softmstr.htm )
Replace Hackmaster with TealMaster, the supercharged 100%-compatible
system extensions manager. TealMaster
adds enhanced stability, configuration and diagnostic features and PalmOS 5.0
hack emulation.
TEALMEAL ( http://www.tealpoint.com/softmeal.htm )
Save and recall your favorite restaurants with TealMeal, the personal
restaurant database. With TealMeal's
handy sorting and selection options, never ask "where to eat" again.
TEALMEMBRAIN ( http://www.tealpoint.com/softmemb.htm )
Stop crashes and monitor your memory use with TealMemBrain, the
application stack stabilizer.
TealMemBrain boosts your stack space on OS3 and OS4 handhelds,
eliminating the major cause of system instability.
TEALMOVER ( http://www.tealpoint.com/softmovr.htm )
Beam, delete, rename, and copy files with TealMover, the file management
utility for SD/CF/MS cards. TealMover
lets you see, move, modify, hex edit, and delete individual files.
TEALMOVIE ( http://www.tealpoint.com/softmovi.htm )
Play and convert high-quality video and synchronized sound with the
TealMovie multimedia system. TealMovie
includes a handheld audio/movie player and a Windows AVI/MPEG/Quicktime
converter program.
TEALNOTES ( http://www.tealpoint.com/softnote.htm )
Insert freehand graphics anywhere with TealNotes "sticky
notes" for Palm OS. TealNotes can
be inserted into memos, to-do lists, address book entries--almost anywhere you
currently have editable text.
TEALPAINT ( http://www.tealpoint.com/softpnt.htm )
Paint, sketch, or draw with TealPaint, the all-in-one graphics paint
program for PalmOS. Highlights include
20 tools, 16 patterns, 24 brushes, zoom, hires, layers, multi-undo, and a
desktop converter.
TEALPHONE ( http://www.tealpoint.com/softphon.htm )
Supercharge the address book with TealPhone, the contacts replacement
with superior interface and options.
Highlights include enhanced display, search, phone-dialing, groups, and
linking.
TEALPRINT ( http://www.tealpoint.com/softprnt.htm )
Print text and graphics to IR, serial, and Windows printers with
TealPrint. With numerous connection
options, TealPrint, is the all-in-one text and graphic printing solution.
TEALSAFE ( http://www.tealpoint.com/softsafe.htm )
Store your passwords, credit cards, PIN numbers, and bank accounts in
the TealSafe data wallet. With maximum
security and encryption, TealSafe is a must for features and security.
TEALSCRIPT ( http://www.tealpoint.com/softscrp.htm )
Replace or restore Graffiti with TealScript, the text recognition system
you can customize. Unlike other
systems, you can make or change your own strokes for better speed and accuracy.
TEALTRACKER ( http://www.tealpoint.com/softtrac.htm )
Track time and expenses with a fast, easy to use interface that requires
minimal effort. Generate reports and
export data to a spreadsheet.
TealTracker is your personal time clock.
TEALTOOLS ( http://www.tealpoint.com/softtool.htm )
Improve productivity with TealTools pop-up Palm Desk Accessories. TealTools includes a popup calculator,
clock/stopwatch, preferences panel, editing panel, memopad, and a file/backup
manager.
Appendix E – Revision History
Release 4.39 – May 31, 2006
·
Added support for running folios with dual input fields from card
by increasing text cache count
·
Improved accuracy of match calculations when dividing floating
point numbers
·
Fixed rare math error that would give wrong answer when
multiplying certain floating point numbers
Release 4.35 – March 28, 2006
- Added support
to browsing screen for 5-way navigator control of newer devices
- Added
auto-selection of text field in registration key entry screen
- Improved
accuracy of multiplication of large numbers in folios
Release 4.34 – March 24, 2006
- Added many new
titles to included folio set
- Fixed file
corruption when changing folio category on Samsung smartphone
- Fixed
calculation of free memory on devices with non-volatile memory
Release 4.32 – September 10, 2003
- Fixed CYCLE
command to work with POPUP objects
- Fixed math
calculation error dividing small numbers
- Fixed number
display error when overflowing decimal sizes
- Fixed crash on
OS3.0 handhelds in 4.31
Release 4.30 - June 26, 2003
- Added
auto-selection of list or table item when clicking on imbedded hyperlink
- Increased
precision on 32-bit divide operations with large divisors
- Fixed category
poplist display under OS5
- Fixed odd
linking behavior and instability with TABLE objects
- Fixed folio
"back" button functionality on nested link calls
- Fixed folio
"back" button functionality on VFS cards
- Fixed missing
Memory Stick files/folders on Sony NX70
- Fixed incorrect
auto selection of entire text field in popedit objects under OS5
Release 4.21
October 22, 2002
·
Fixed linking between folios with imbedded text links
·
Added support for TREO jog dial in selecting files
·
Added support for Arm-based Palm input controller
Release 4.20
August 29, 2002
·
Added new "POPFIND" objects
·
Added support for "BACK" buttons (set TARGET to
"$BACK")
·
Added support for untargeted INPUT buttons for STROKE_FIND (set
TARGET to letter to seek)
·
Removed flash of folio list when transitioning between linked
folio
·
Increased object reference maximum nesting level from 5 to 15
levels
Release 4.10 May 21, 2002
·
Added
color icons to list view
·
Added
support for OS5.0 high-resolution program and launcher icons
·
Added
masking of file extensions (.pdb and .prc) in SD card filenames
·
Updated
MkTlInfo Utility to warn of downward referencing LINKS (should be up)
·
Fixed
double-tapping of folder names in card file manager
·
Fixed
centering of button text with small buttons rounding up ½ pixel
Release 4.01 March 7, 2002
·
Fixed
label display for POPOUTLINE objects
·
Fixed
display of full screen POPIMAGE objects
Release 4.00 February 1, 2002
·
Added
support for displaying folios directly off SD/MMC/CF flash cards
·
Added
preferences option to remember category
·
Added
preferences option to remember device
·
Added
support for MATH objects for calculating floating point values
·
Added
support hidden objects and multiple-page folios via new SETPAGE object
·
Added
DRAW objects for custom graphic charts and rendering
·
Added
TABLE and POPTABLE objects
·
Added
POPOUTLINE objects
·
Added
support for POPMERGE text-merge objects
·
Added
support for PRINTMERGE printing through TealPrint
·
Added
RANDOM object
·
Added
YEAR object
·
Added
MONTH object
·
Added
DAY object
·
Added
HOUR object
·
Added
MINUTE object
·
Added
INPUT objects to make calculator-style buttons
·
Added
support for text compression
·
Added
support for launching TealMovies and other external databases
·
Added
compatibility with future PalmOS versions and devices
·
Updated
to work with folios containing graphics under OS 4.0
·
Fixed
passkey functionality on CLIE
·
Fixed
occasional crash launching TealDoc from TealInfo folio
·
Fixed
display of images imbedded into folios
Appendix F – Contact Info
TealInfo by TealPoint Software
©1999-2006 All Rights Reserved.
TealPoint Software
TealInfo Registration
454 Las Gallinas Ave #318
San Rafael, CA 94903-3618
We look forward to hearing from you.
Please visit us at www.tealpoint.com, or
email us at contact@tealpoint.com.
Appendix G – Registering
Registering allows you to use the program past the 30 day
expiration period and turns off registration reminders.
Currently, you may register by snail mail or online with a
credit card and a secured server from the store where you downloaded the
software. For the first option, send
the following information on a sheet of paper separate from your payment.
·
Product Name
·
E-Mail Address
·
HotSync User ID (Pilot Name Required for Passkey generation. It
can be found on the main screen of the HotSync application on the Pilot as
"Welcome ________" or in the corner on a PalmIII or higher)
·
Check (drawn off a US Bank) or Money Order for ($19.95 US). No international checks or money orders
please.
Appendix H – Legal Notice
We at TealPoint Software are committed to providing quality,
easy-to-use software. However, this product is provided without warranty and
the user accepts full responsibility for any damages, consequential or
otherwise, resulting from its use.
This archive is freely redistributable, provided it is made
available only in its complete, unmodified form with no additional files and
for noncommercial purposes only. Any other use must have prior written authorization
from TealPoint Software.
Unauthorized commercial use includes, but is not limited to:
§
A product for sale.
§
Accompanying a product for sale.
§
Accompanying a magazine, book or other publication for sale.
§
Distribution with "Media", "Copying" or
other incidental costs.
§
Available for download with access or download fees.
This program may be used on a trial basis for 30 days. The
program will continue to function afterwards. However, if after this time you
wish to continue using it, please register with us for the nominal fee listed
in the program.
Thank you.
CUSTOMER LICENSE AGREEMENT
YOU ARE ABOUT TO
DOWNLOAD, INSTALL, OPEN OR USE PROPRIETARY SOFTWARE OWNED BY TEALPOINT
SOFTWARE, INC. CAREFULLY READ THE TERMS AND CONDITIONS OF THIS END USER LICENSE
BEFORE DOING SO, AND CLICK BELOW THAT YOU ACCEPT THESE TERMS.
1. License. You are
authorized to use the Software Product owned and developed by TealPoint
Software, Inc. on a single hand-held computing device on a trial basis for
thirty (30) days. If after 30 days you wish to continue using it, you are
required to register with TealPoint and pay the specified fee. This license is
not exclusive and may not be transferred. You may make one copy of the Software
for back-up and archival purposes only.
2. Ownership. You
acknowledge that the Software Product is the exclusive property of TealPoint
Software, Inc, which owns all copyright, trade secret, patent and other
proprietary rights in the Software Product.
3. Restrictions. You
may NOT: (a) decompile or reverse engineer the Software Product; (b) copy
(except as provided in 1 above) sell, distribute or commercially exploit the
Software product; or (c) transfer, assign or sublicense this license.
4. Disclaimer of
Warranty and Liability. TEALPOINT MAKES NO WARRANTY, EXPRESS OR IMPLIED, AS TO
THE ACCURACY, COMPLETENESS OR FUNCTIONING OF THE LICENSED SOFTWARE, INCLUDING
WITHOUT LIMITATION, WARRANTIES OF MERCHANTABILITY OR OF FITNESS FOR A
PARTICULAR PURPOSE, ALL OF WHICH TEALPOINT DISCLAIMS. ALL LIABILITY IS
DISCLAIMED AND TEALPOINT ASSUMES NO RESPONSIBILITY OR LIABILITY FOR LOSS OR
DAMAGES OF ANY KIND, DIRECT OR INDIRECT, INCIDENTIAL, CONSEQUENTIAL OR SPECIAL,
ARISING OUT OF YOUR USE OF THE LICENSED SOFTWARE, EVEN IF ADVISED OF THE
POSSIBILITY THEREOF.
5. Termination. You
may terminate this Agreement at any time by destroying your copy(ies) of the
Software Product. The Agreement will also terminate if you do not comply with
any of its terms and conditions, at which time you are required to destroy your
copy(ies) of the Software Product and cease all use.
6. Applicable Law.
This Agreement is governed by the laws of the State of California.